Jira Advanced Roadmaps (Plans) Guide for Project Managers

Start using Visor today
- Visualize all your projects and data

- Roll up multiple projects into portfolio views
- Try Visor for FREE
Jira Advanced Roadmaps (also referred to as “Jira Plans”) is a powerful Jira project management feature because it allows you to have a high-level view of all your Jira projects in one place.
Formerly called Portfolios for Jira, this roadmap / Gantt functionality is a trusted staple for both agile and waterfall teams. Whether you’re looking to communicate progress across many projects or simply need a Jira portfolio management planning tool, Advanced Roadmaps is a great option.
In this post, I’ll cover:
- Who can access Jira Advanced Roadmaps (AKA: Jira Plans)
- Advanced Roadmaps’ Benefits, Use Cases & Limitations
- How to Create & Configure Jira Advanced Roadmaps
- Less expensive alternatives
By the end of this post, you’ll know if you have access to this built-in portfolio management feature and how to use it to get a holistic view of your teams’ work.
The Benefits & Use Cases of Jira Advanced Roadmaps
Before we go into the benefits, let’s briefly describe what this feature is.
What is Advanced Roadmaps in Jira?
Jira Advanced Roadmaps is a built-in roadmap / Gantt feature within Jira Premium and Enterprise plans, which allows you to bring in multiple projects into one roadmap.
(We go over how to tell which one you have in this section, and also offer cost-effective Jira Advanced Roadmap here.)
The real magic behind Jira Advanced Roadmaps / Jira Plans lies in the fact that you can have a 30,000-foot view of all your projects in one view. But there’s more to this roadmapping tool than just that. Below, we go over what makes Jira Advanced Roadmaps such a beneficial Jira portfolio management tool.
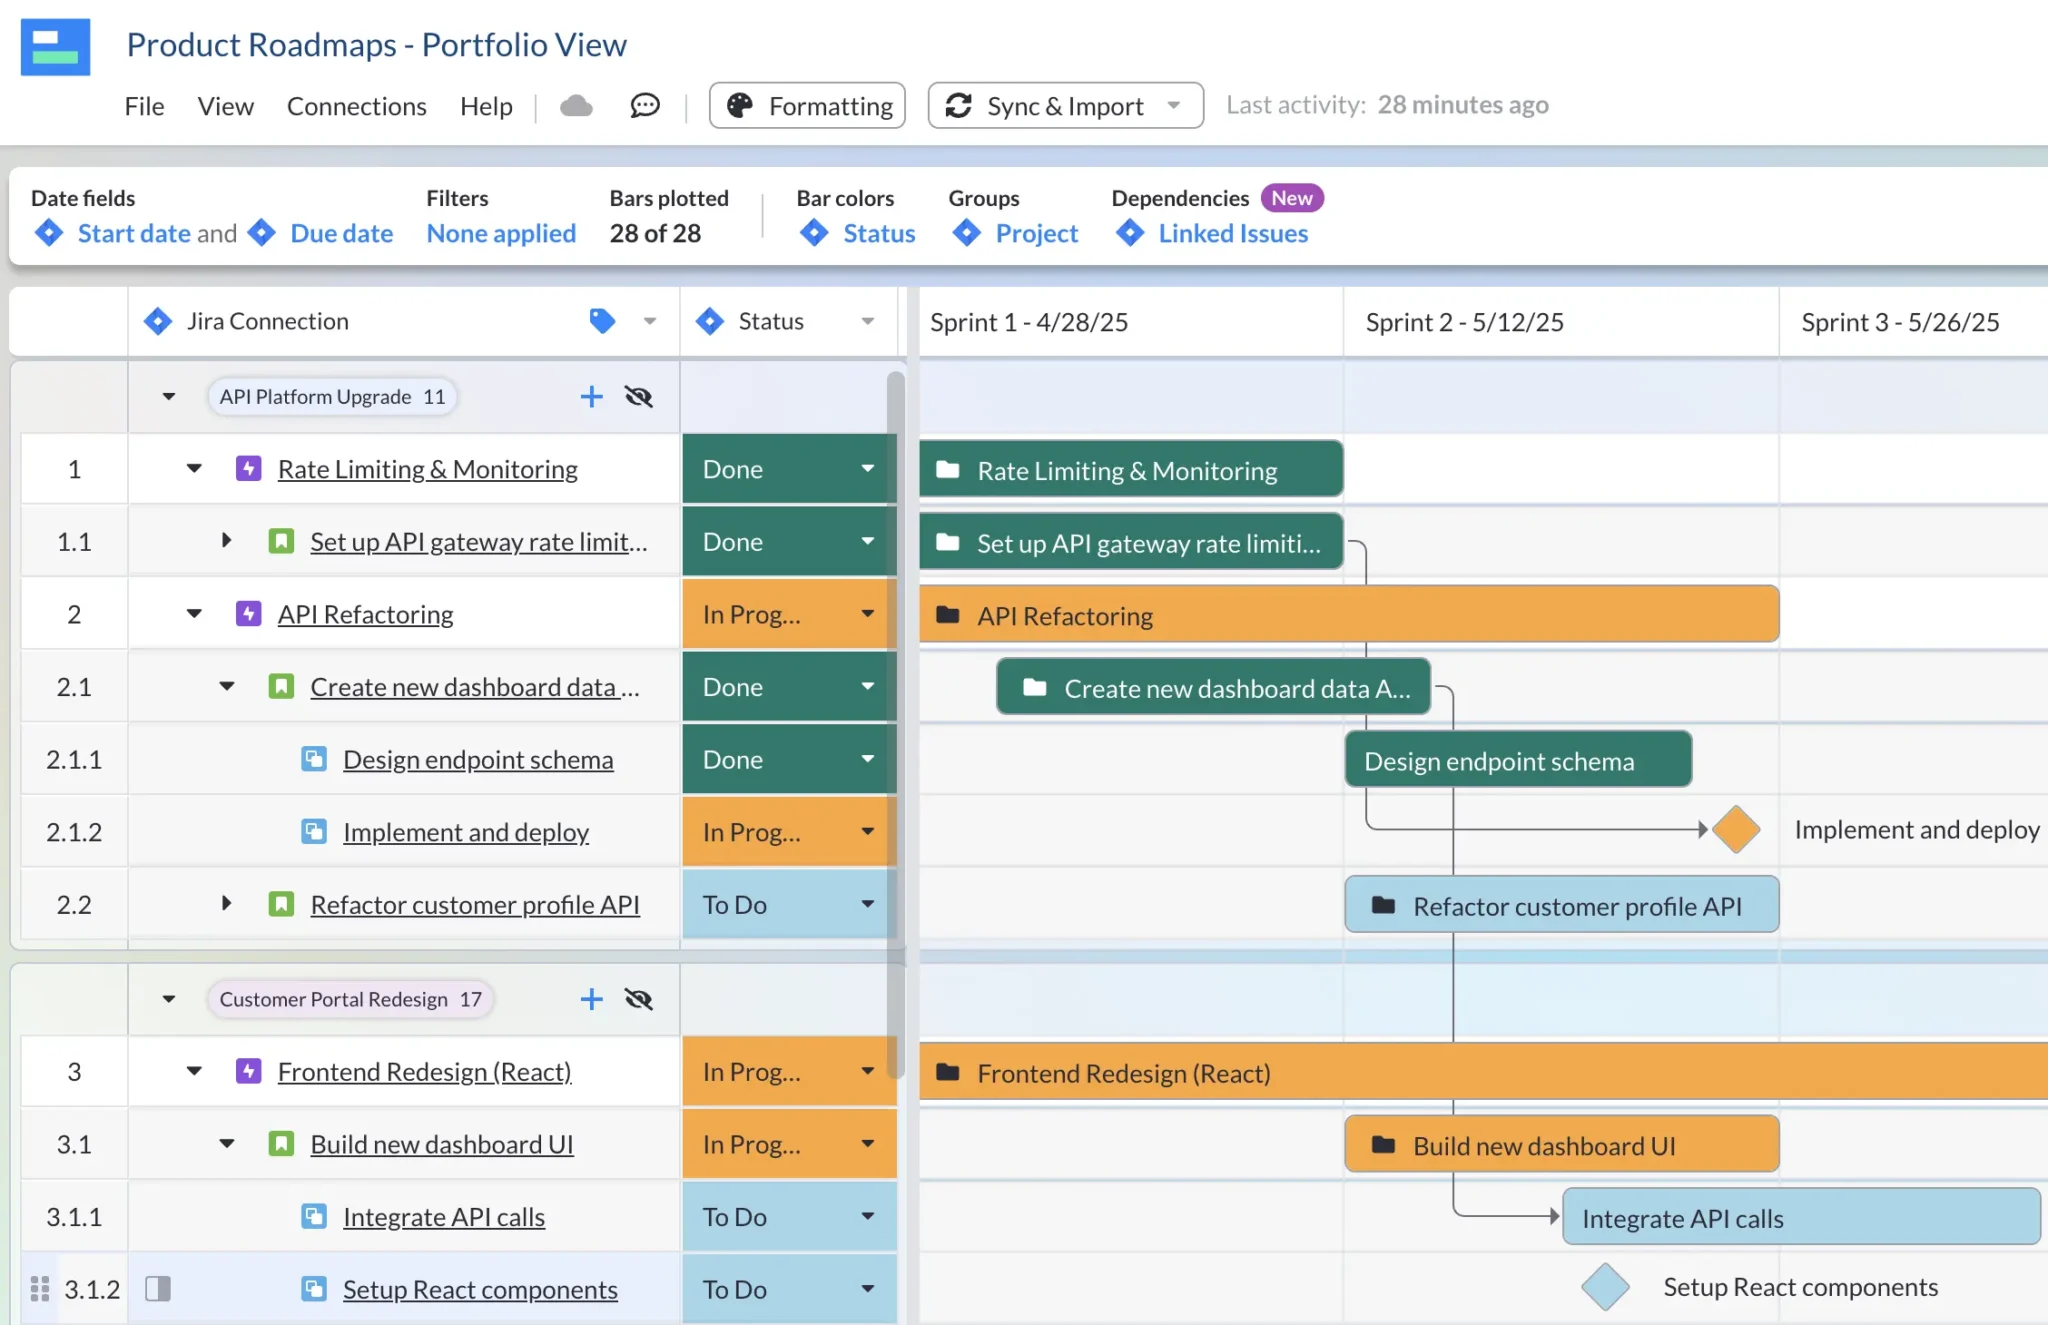
Example of a Jira Advanced Roadmap with two different projects:
Benefit #1: You get a holistic view of multiple Jira projects
If you’re a project manager who oversees numerous projects, you’ll appreciate that you can bring in all (or just a few of them) into one roadmap. Unlike the Timeline / Basic Roadmaps option that Jira also offers, you’re not restricted to visualizing just one project.
You can bring in multiple projects or boards in Advanced Roadmaps:
With Basic Roadmaps, you can’t see what work is in another sprint on another board or the Jira issues in another project. Advanced Roadmaps, however, brings everything together. It gives you visibility, allowing you to see all the initiatives, epics, stories, tasks, and subtasks in one view; this holistic view is priceless.
TLDR:
- Advanced Roadmaps / Plans: Can show multiple projects (or boards)
- Basic Roadmaps / Timeline: Can show just one Jira project
In addition, this one view saves you needless clicking and time hopping over from one project or board to another. However, that’s not the only benefit to this powerful roadmapping feature.
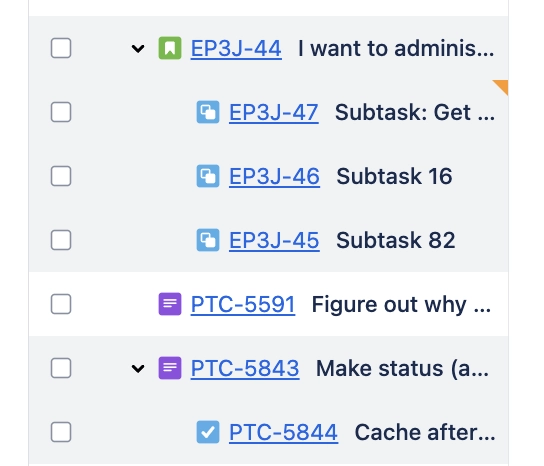
Benefit #2: Jira Advanced Roadmaps can show all hierarchy levels
There are many differences between Advanced Roadmaps and Jira’s free Timeline roadmap option; chief among them is how Jira Advanced Roadmaps allows you to show an entire hierarchy of an epic (or initiatve).
The free roadmap option in Jira does not drill down to the subtask. However, Jira Advanced Roadmaps does, allowing you to see the breadth of en epic’s multiple layers of work. Seeing the entire hierarchy is helpful for project managers that need to have an understanding of what’s actually going on.
Advanced Roadmaps hierarchy levels allow you to drill-down to the subtask level:
TLDR:
- Advanced Roadmaps / Plans: Can show entire hierarchy (including subtask)
- Basic Roadmaps / Timeline: Shows just epic + tasks / basic
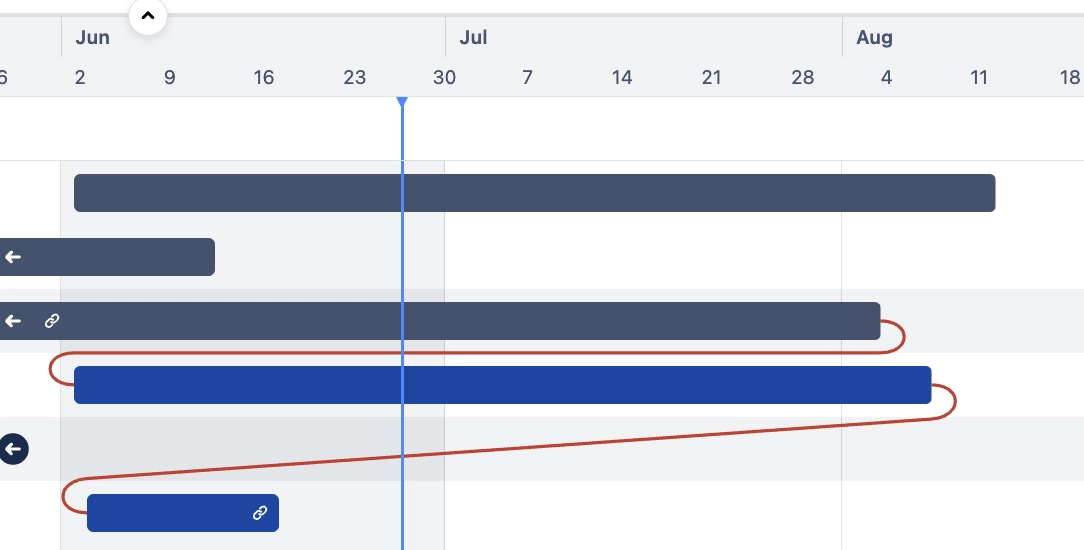
Benefit #3: It’s easier to manage, create, and see dependencies
While you can certainly create linked Jira issues (which Jira recently started calling “Jira Work Items”) within the ticket for that issue, it’s arguably much easier to do so in Advanced Roadmaps.
Why it’s easier to manage dependencies in Jira Advanced Roadmaps:
- You can see the issue that blocks another visually. It’s easy to connect the two. Also, many people need visuals to comprehend complicated plans.
- You don’t need as many clicks between Jira issues and avoid missing a dependency altogether.
- You actually can get a “Dependency View” for dependency management right in the roadmap, allowing you to see all dependencies in one place.
Jira Dependencies display as red lines in Advanced Roadmaps:
Benefit #4: It’s a great place to brainstorm without affecting your source of truth
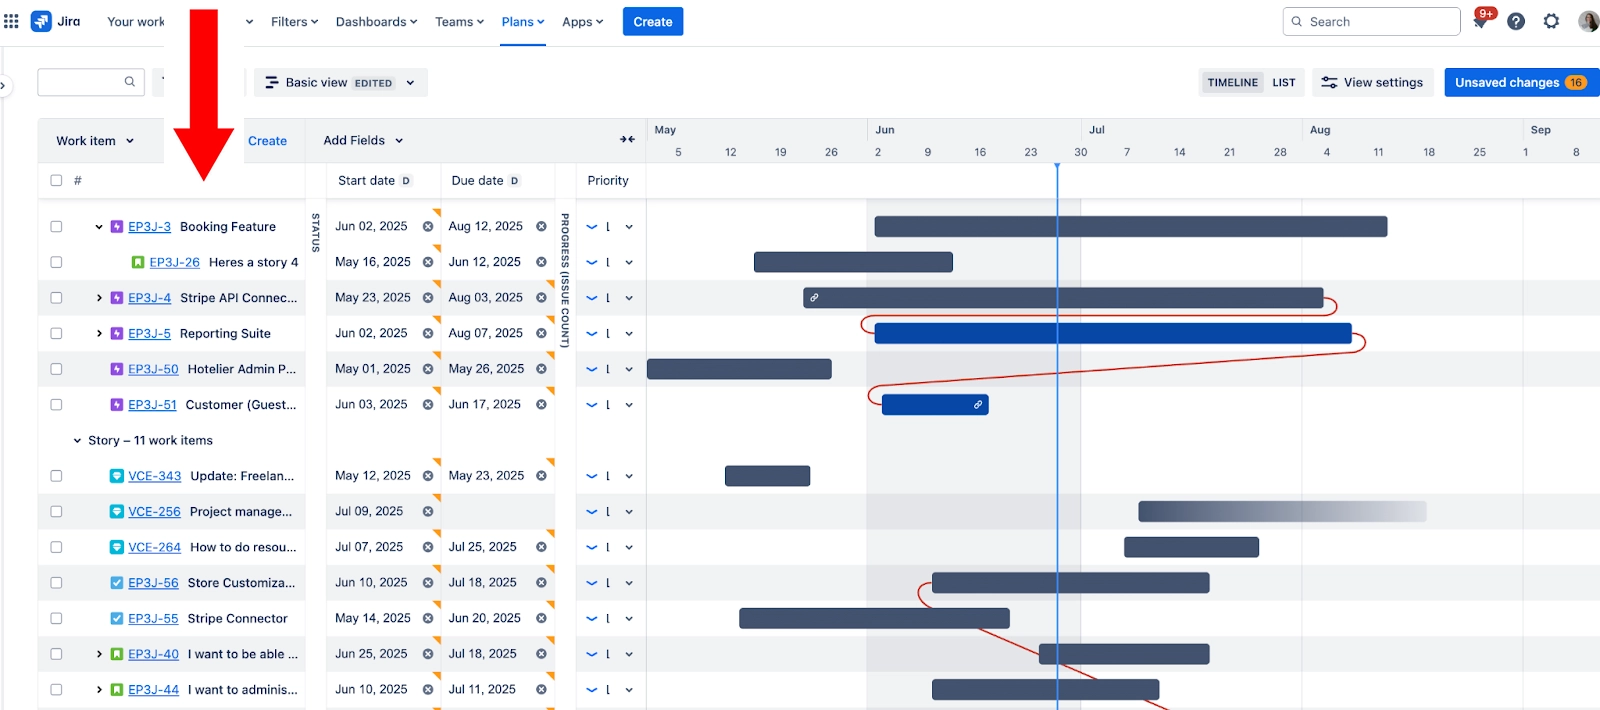
One wonderful thing about Jira Advanced Roadmaps is that the Jira issues / Work Items you create in the roadmap don’t automatically propagate over to your Jira boards. In other words, the changes you make in Jira Advanced Roadmaps don’t update the metadata in a Jira issue.
You actually have to go over and review “Unsaved changes” (which you’ll see in the upper-right part of your roadmap) to decide which you want to get pushed over to Jira.
Changes / issues created in Advanced Roadmaps must be pushed to Jira:

This functionality allows you to have a low-stakes area to play around with how your project might play out. You can visualize dependencies, add subtasks, change dates, and more without it affecting your source of truth: Jira.
This makes Jira Advanced Roadmaps a helpful agile project planning tool for teams that don’t want to officially commit to dates in their Jira tickets or even just an easy way for waterfall teams to see if their plans are realistic before pushing changes over to Jira.
Summary: Jira Advanced Roadmaps Use Cases
While Jira does have a less advanced roadmap feature available to all Jira users (including free users) called Timeline, it’s pretty limited. (We covered the differences between Timeline & Jira Advanced Roadmaps in another post.)
Jira Advanced Roadmaps is a great option if you need to:
- Visualize multiple Jira projects (or boards) in one roadmap
- Need to have subtasks / entire hierarchy visualized in the roadmap
- See all your issues in one place to plan and set dependencies
- Have cross-collaboration and cross-dependency features across projects
- Have a visual place to brainstorm and plan without it pushing changes to your source of truth (Jira)
Can I Access Jira Advanced Roadmaps?
Jira Advanced Roadmaps is available in Premium and Enterprise subscriptions if you’re using Jira Cloud. Therefore, if you’re on a free or Standard plan of Jira Cloud, you do not have access to Advanced Roadmaps.
If you do not have access to Jira Advanced Roadmaps but still want to create Portfolio Roadmaps (AKA: roadmaps with multiple Jira projects), check out Visor in the Atlassian Marketplace.
If you are on Jira Data Center (and not Jira Cloud), you can access all of Advanced Roadmaps’ features (although some of the features look different.) Because Atlassian is sunsetting Jira Data Center and most users aren’t on it, we’ll just focus here in Jira Cloud.
How can I tell if I have access to Advanced Roadmaps?
If you’re not sure what plan your company has, there is a very easy way to tell: Does “Plans” show up in the nav bar? If so, you do have access.
If “Plans” shows up in nav bar, you have access to Jira Advanced Roadmaps:

Is it called Jira Advanced Roadmaps or Plans?
This is a great question, as Atlassian has changed the name of this product many times.
It used to be called Portfolios for Jira. Then, Advanced Roadmaps. Now it shows up as “Plans” in the app, but people in the Atlassian Community still seem to call it “Jira Advanced Roadmaps.” Either one is accurate and fine to use.
Here, we’ll mostly use Jira Advanced Roadmaps.
Limitations of Jira Advanced Roadmaps
While Advanced Roadmaps are powerful, there are certainly some limitations. We’ll cover them here.
If these limitations are deal breaks for you (or you don’t have access to Jira Advanced Roadmaps because you’re on a Jira Free or Standard plan), check out our recommended alternative to Jira Advanced Roadmaps.
Limitation #1: No Milestones Feature
Surprisingly, there is no Jira milestones feature.
Milestones are popular in Gantts and roadmaps because they make key dates in a project crystal clear to both project managers and stakeholders.
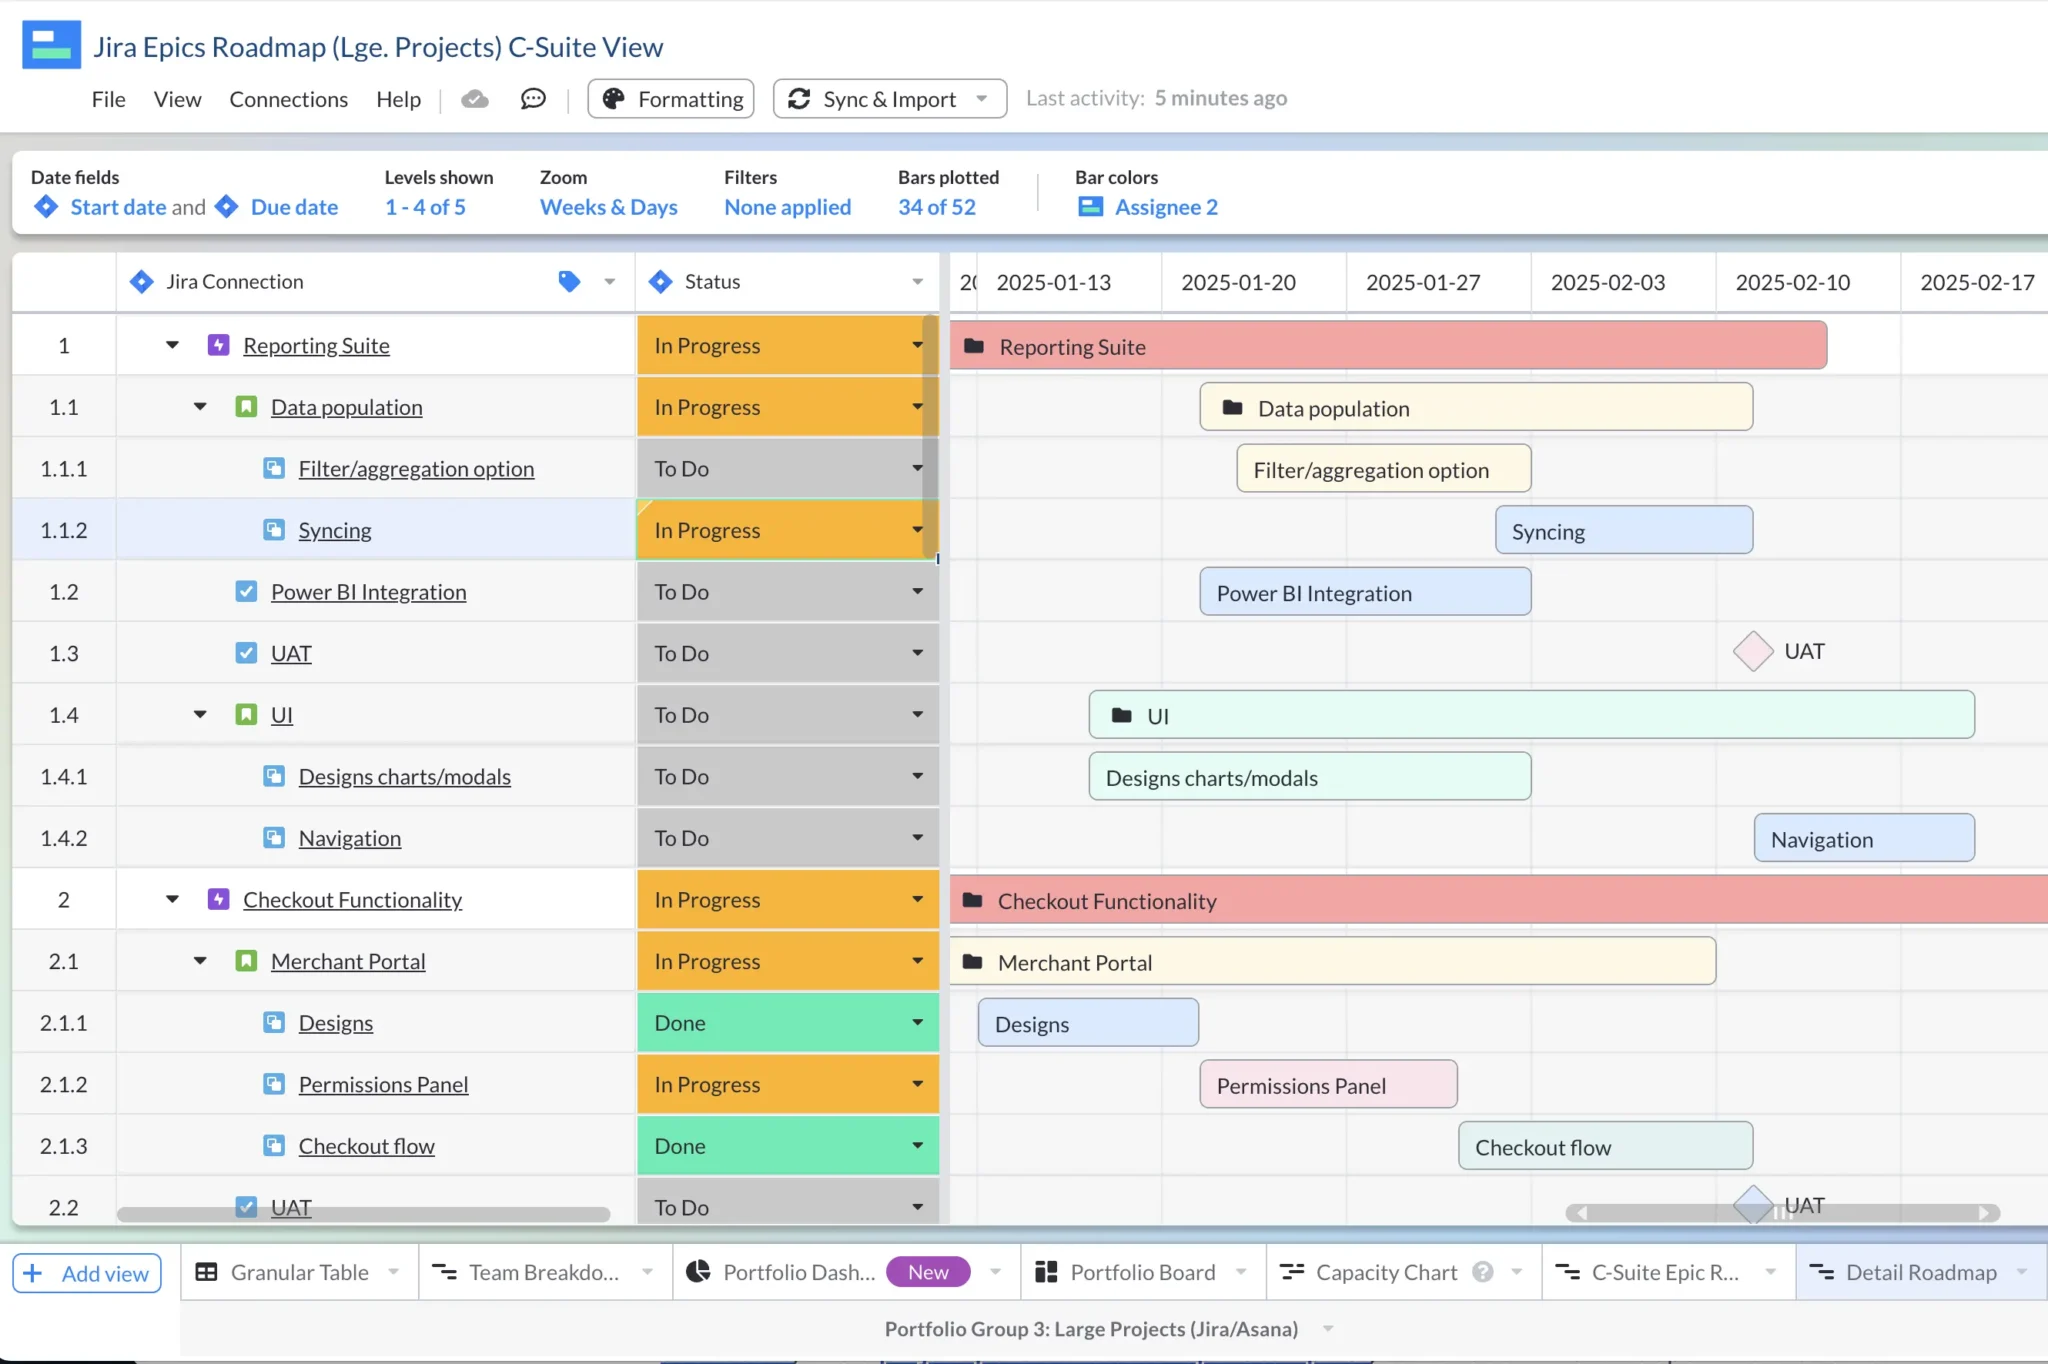
Because Visor has a milestone feature and syncs with Jira, allowing you to display Jira data in a roadmap, you bypass this limitation by using Visor.
Example of a Jira Roadmap with Milestones (displayed as diamonds), created in Visor:
Limitation #2: Can Only Share Internally
Jira does not have guest access, meaning you can’t share your roadmaps with clients or collaborators who aren’t in Jira. Everyone viewing the Advanced Roadmaps would need a Jira license.
Again, Visor is one way to overcome this challenge.
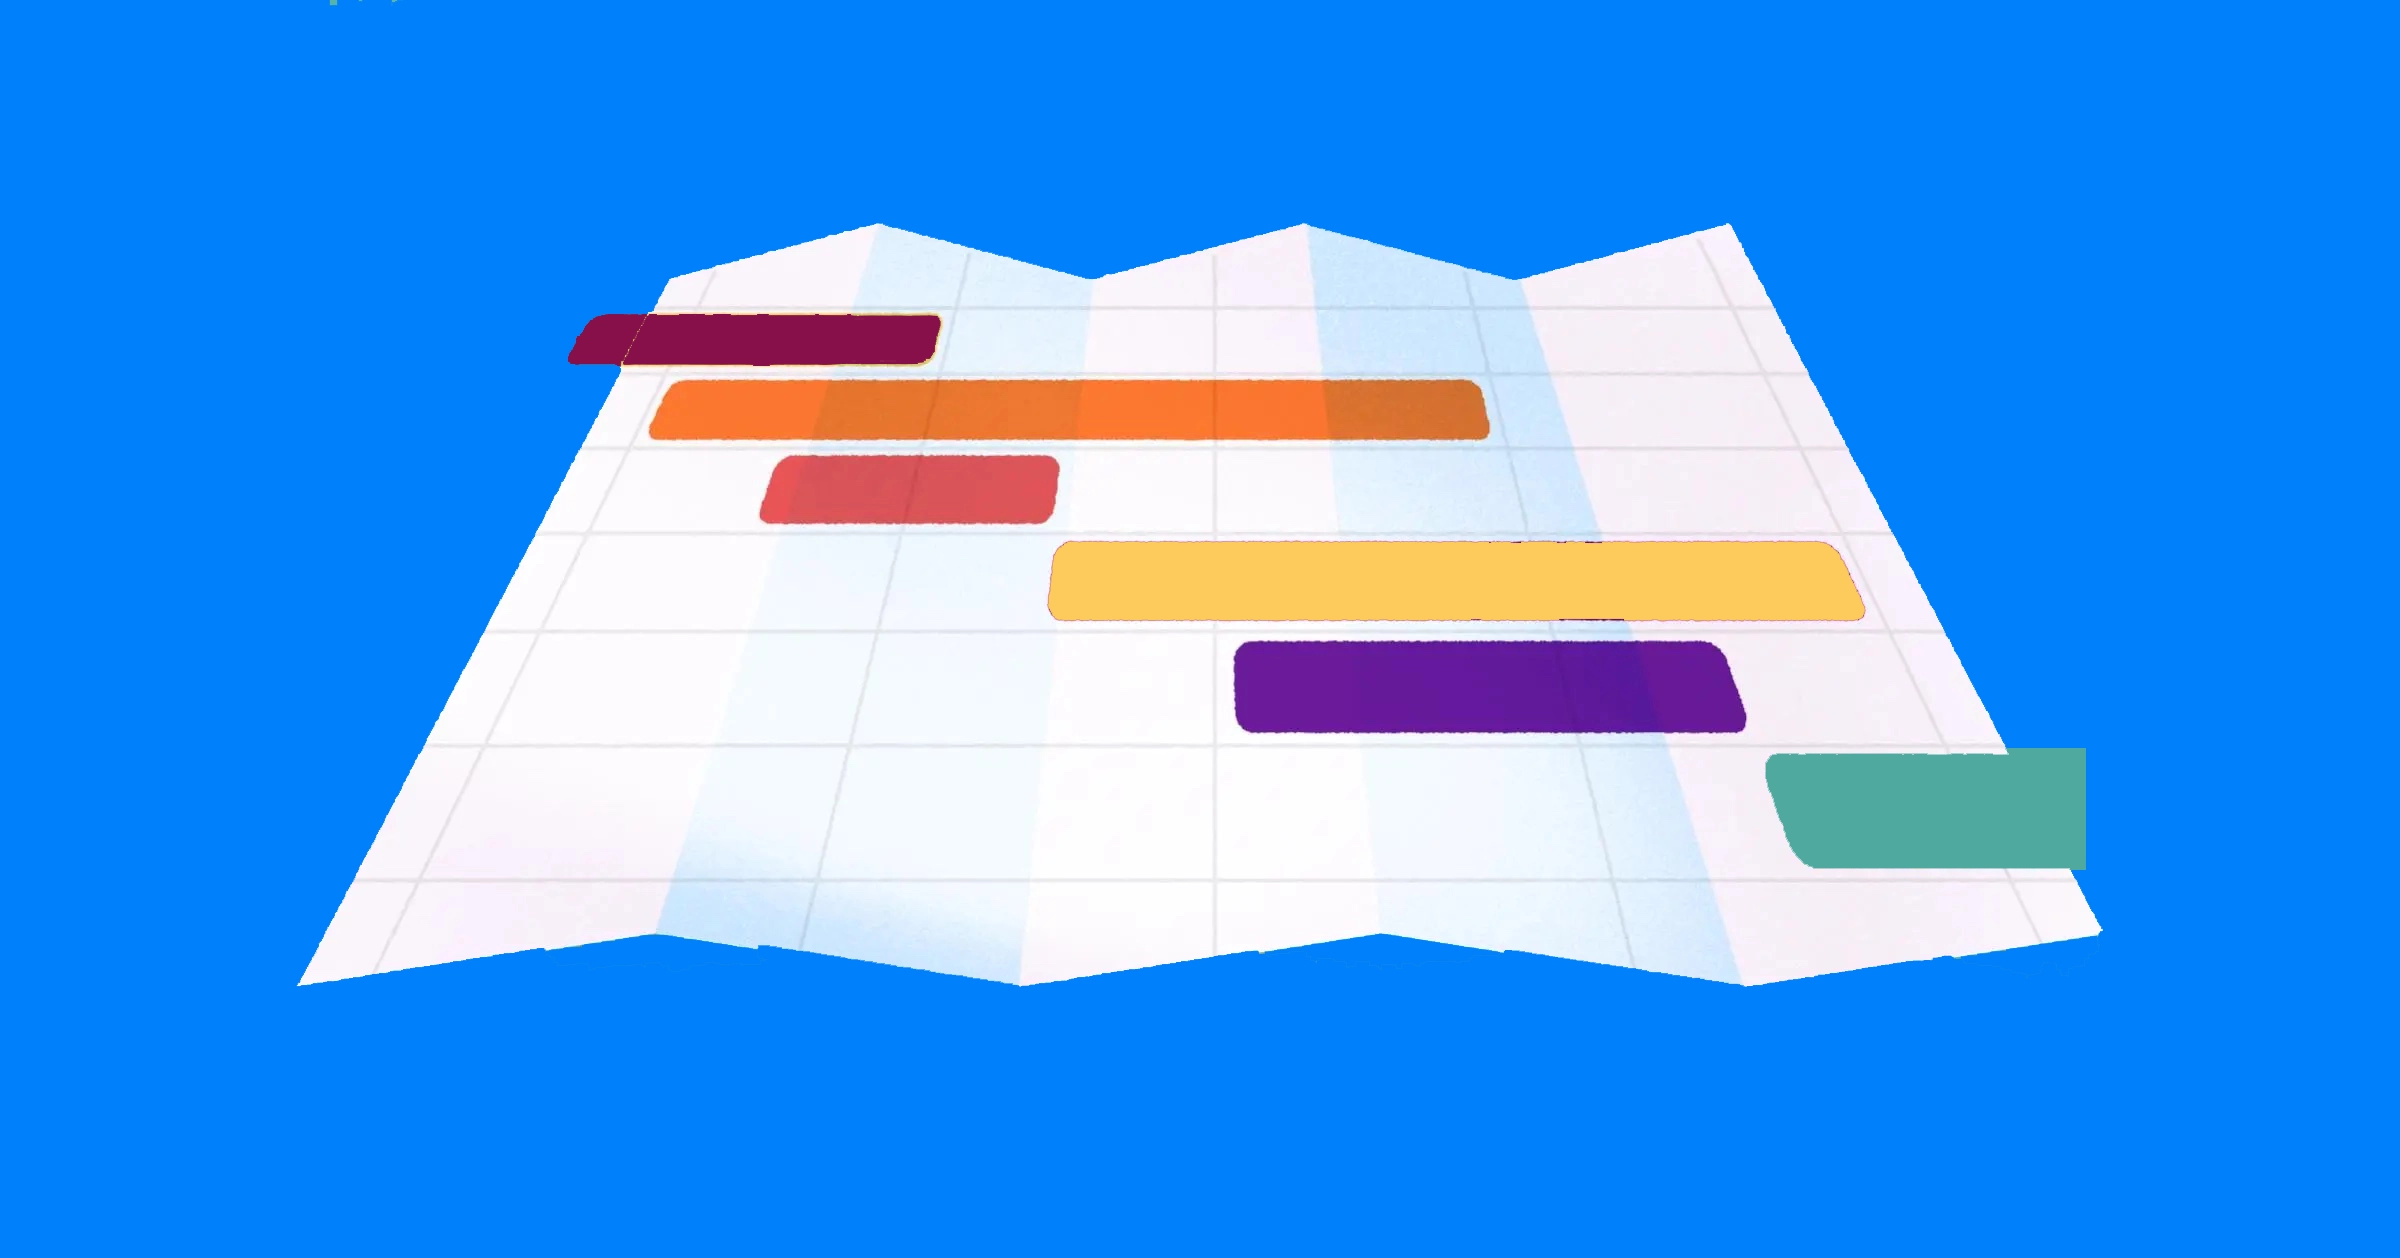
Limitation #3: No Customization for Roadmap Bar Colors
The colors you use in a roadmap help tell your story. Red can often mean blocked or in danger, green and blue are often colors associated with things going smoothly. However, Jira Advanced Roadmaps only offers a few colors for roadmaps’ bars (e.g., grey and blue).
Visor offers more color-coding options for your Jira Roadmaps:
Limitation #4: Limited Rollup Options
While Jira Advanced Roadmaps does offer some rollup capabilities, there are some serious limitations. For one, rollups don’t work for custom fields in Advanced Roadmaps. In fact, rollup calculations are only available for a small number of fields.
So, if you create a custom field that would rollup to estimate an epic before work begins, you wouldn’t be able to display the rollup of all that in the Advanced Roadmaps.
Rollup calculations aggregate data from child records and display it on their parent record. They can work for number or date fields.
In addition, because Advanced Roadmaps allows you to just show one set of dates (e.g., start / end dates), you can’t also include a secondary set of dates (e.g., approval start / end) alongside it. If your team needs to keep track of different types of dates, this can be challenging.
Visor offers more robust rollup calculations for Jira. Watch the video below to see how it works:
Cost-Effective Alternative to Advanced Roadmaps
If you don’t have a Jira Premium subscription (and don’t want to double your Jira bill by upgrading) or the limitations discussed above make Jira Advanced Roadmaps less helpful to you, then we’ll go over the best alternative: Visor.
Example of a Jira Roadmap created in Visor:
While Visor can be found in the Atlassian Marketplace, it is not a Jira plug-in. This is an important distinction because it means you don’t have to buy a license for everyone at your org. Instead, Visor allows you to bypass the limitations of Jira’s free roadmap option, along with the limitations Jira’s Advanced Roadmaps offers.
With Visor, you can:
- Import and visualize multiple Jira projects into one roadmap
- Share externally to teams and clients who don’t use Jira
- Display milestones alongside your Jira data for enhanced clarity
- Color-code your roadmap based on any field you please (e.g., assignee)
- Filter out the fields and nested levels you don’t want to display
- Create custom fields that only live in Visor (and don’t pollute your Jira)
- Rollup custom fields and secondary date fields
- Display Jira Dependencies (just like you can in Advanced Roadmaps)
Our Team plan also offers unlimited viewers, making it a great option for teams that need to share roadmaps with multiple stakeholders who either don’t have access to Jira or never learned Jira.
Don’t take our word for it though. Here’s a review from Alex “Dr. Jira” Ortiz, an expert at Jira project management:
Visor has bi-directional sync with Jira, which ensures that your data stays accurate in the roadmaps you create in Visor.
In addition, Visor has a ton of templates that make it easy to get started with. Whether you want a project portfolio management template that shows multiple projects in one roadmap or a more simple project roadmap template with just one Jira project.
Jira Advanced Roadmaps Pricing
As mentioned a few times in the post, you must have a Jira Premium or Jira Enterprise subscription plan to access Advanced Roadmaps.
When upgrading to a Jira Premium plan for Advanced Roadmaps, you must upgrade EVERY user who has a Jira license. Therefore, the price of getting Jira Advanced Roadmaps is determined by the number of Jira users you have in your org.
Example pricing for 50-person company that has
3 people who need Jira Advanced Roadmaps
Jira Premium Plan Visor Team Plan G2 Review Score ★★★★★ ★★★★★ Monthly upgrade cost to Jira Premium from Standard plan $410.00 n/a Monthly cost for Jira portfolio features $840 $96 Minimum # of paid users Entire org must upgrade 3 View-only users or guest access No, each user needs a
paid licenseYes, free (unlimited)
view-only usersRoadmaps with Multiple Jira Projects ✔ ✔ Jira Dependencies ✔ ✔ Milestones in Roadmaps X ✔ Custom Colors for Charts / Roadmaps Limited color selection ✔ Shareable links for external stakeholders X ✔ Rollup calculations Only for native Jira fields
(but not custom fields)Yes, for all number
or date fields
Getting Started with Jira Advanced Roadmaps
Creating an Advanced Roadmaps is easy. Let’s go through the steps you’ll need to take to make one. In the next section, we’ll get you familiar with the UI of your roadmap and cover more advanced settings.
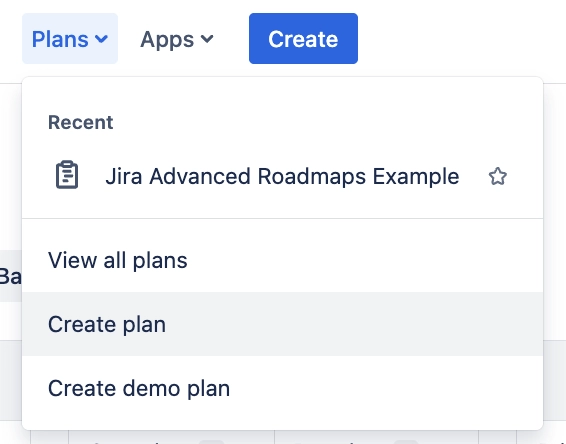
Step 1: Click “Plans” in your Nav Bar
Step 2: Click “Create Plan”
Step 3: Name Your Plan
Pro Tip: Because you’ll likely bring in multiple projects, you’ll want to give your roadmap that is a bit more broad. You can name it after your team or the product release that you’re working on, for example. Avoid naming it something too narrow. However, you can rename it later.
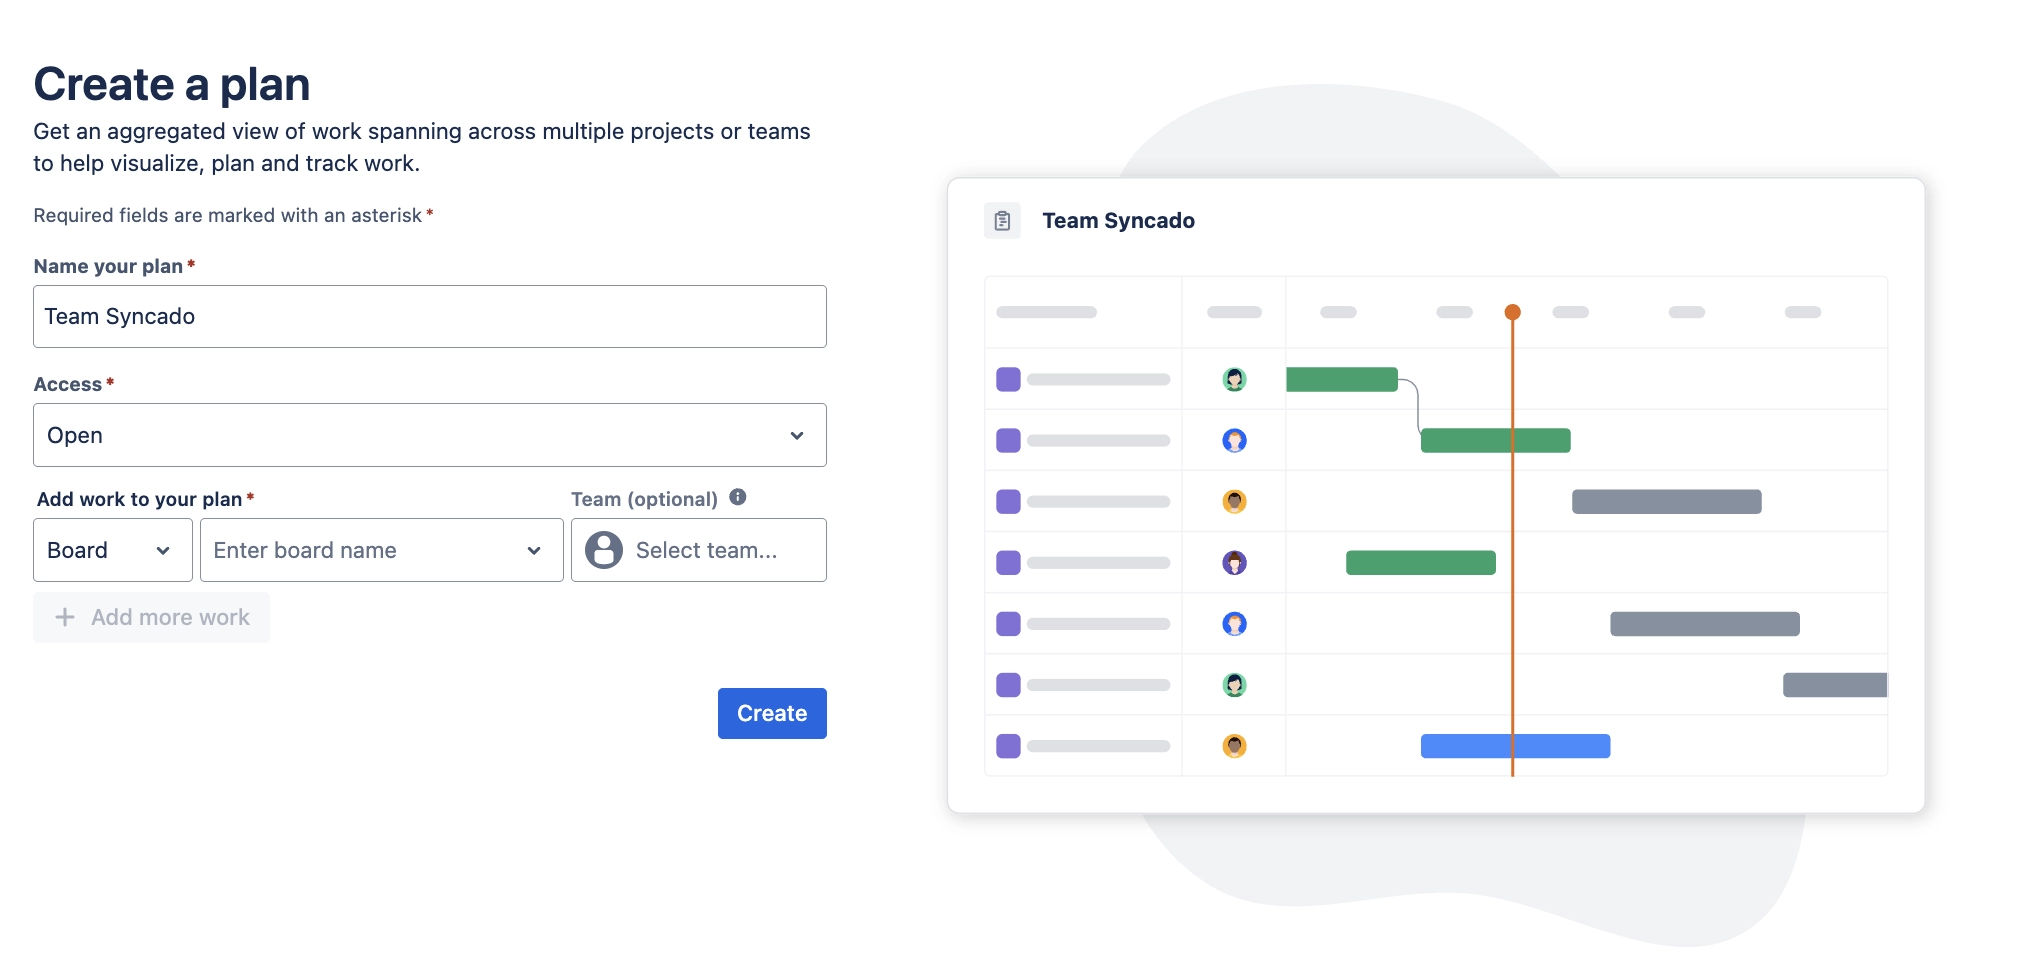
OPTIONAL STEP: You can change the access to private if you’d like. Similar to the name, you can change this after the roadmap is created. Some people like to make their roadmaps private until it’s ready to be shared.
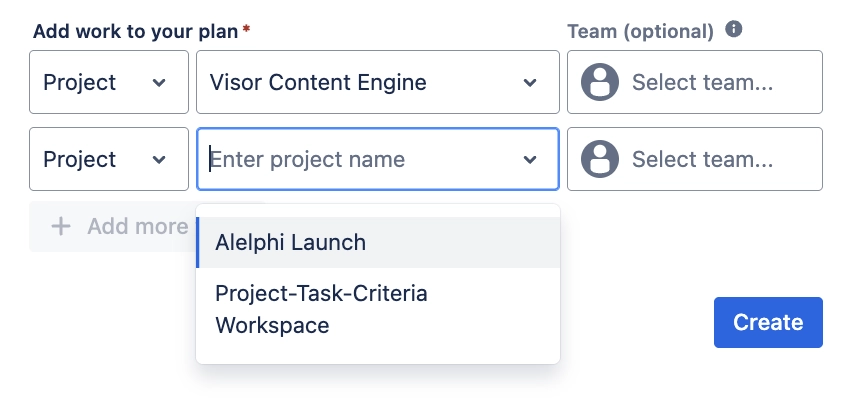
Step 4: Bring in Projects (or Boards) That You Want in Roadmap
Jira allows you to choose Projects, Boards, or Filters that you want to bring in for your Advanced Roadmaps.
- Board = subset of data
- Project = an entire project with multiple boards
- Filter = selected dataset that you want to look at
I tend to choose Project because I can always add filters after the roadmap is created; I’d rather have more than I need initially than trim down what’s displayed later. However, you can always go back in and add more projects (or boards) later on after the roadmap is created.
Step 5: Hit Create
And then you’re done!
Now let’s get into what you can do once you created an Advanced Roadmaps.
How to Navigate UI & Configure Jira Advanced Roadmaps
Let’s go over some of the major components of Jira’s Advanced Roadmaps, along with how to configure what you want to.
Epics (or Highest Hierarchy) Are on the Left
When first looking at your Advanced Roadmaps, you’ll see epics (or initiatives, if you have a higher hierarchy than epic) on the left.
When you expand the epic (by clicking the black “carrot”), you have all your stories, tasks, and and more. Unlike in Basic Roadmaps, you can expand down from Stories and see Subtasks; this is important because a lot of teams use Subtasks but Jira can be picky about how they show them (e.g., subtasks don’t show up in backlogs but they do in boards).
You can create tasks / stories / issues in Jira Advanced Roadmaps. Simply click the three dots next to a parent issue (e.g., epic) and you’ll be able to create a child issue underneath it. In addition, you can drag-and-drop these issues around.

Next to the Jira Epics / Child Issues Are Fields
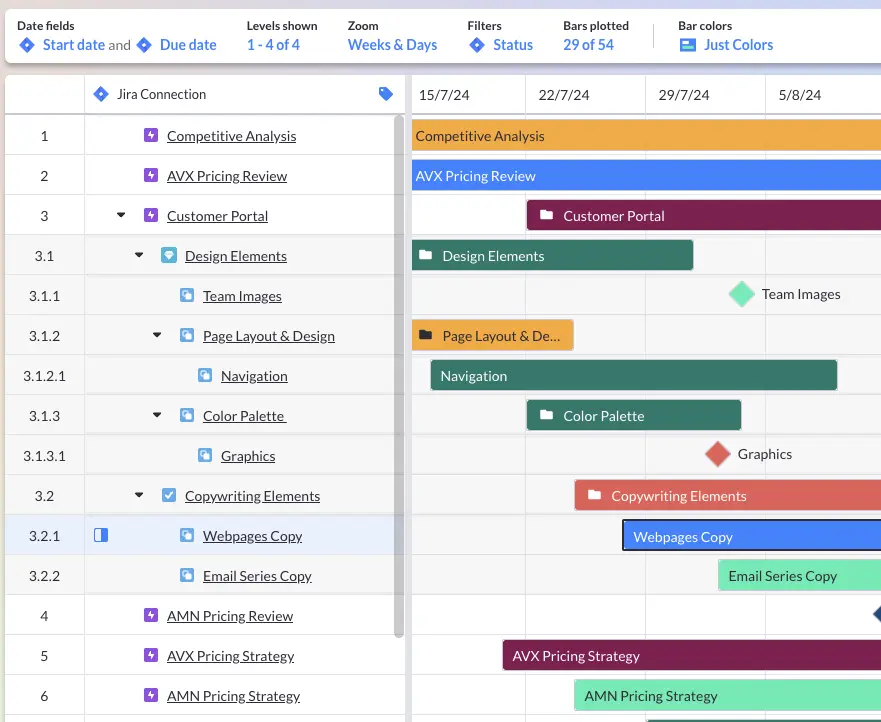
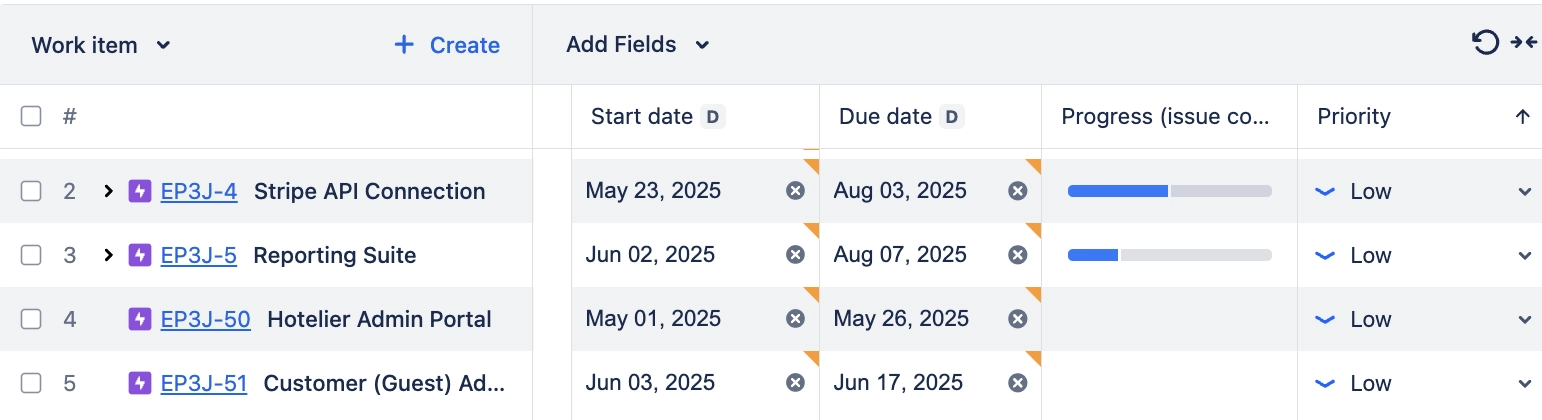
By default, the start and end date fields used to plot your Advanced Roadmaps will be to the right of your Jira Epics / Issues. You can add other types of fields as well, which is helpful for showing the metadata about your project (e.g., assignee, priority). These fields can also be collapsed or expanded.

Fields you should consider adding to make your roadmap more useful:
- Progress: This one shows you how far along you are (either based on story points, issue count, hours, etc). This field helps you answer stakeholderswhen they ask, “how far along are we?” See example below
- Assignee: Great for determining resources
- Status: Useful when needing to see what’s blocked in one view
- Sprint: Helpful for agile teams
- Priority: Makes it easy to sort and see highest-priority work
Example of Advanced Roadmap fields section with Progress & Priority Fields:
You can sort your roadmap by these fields. For instance, if you sort highest to lowest for the priority field.
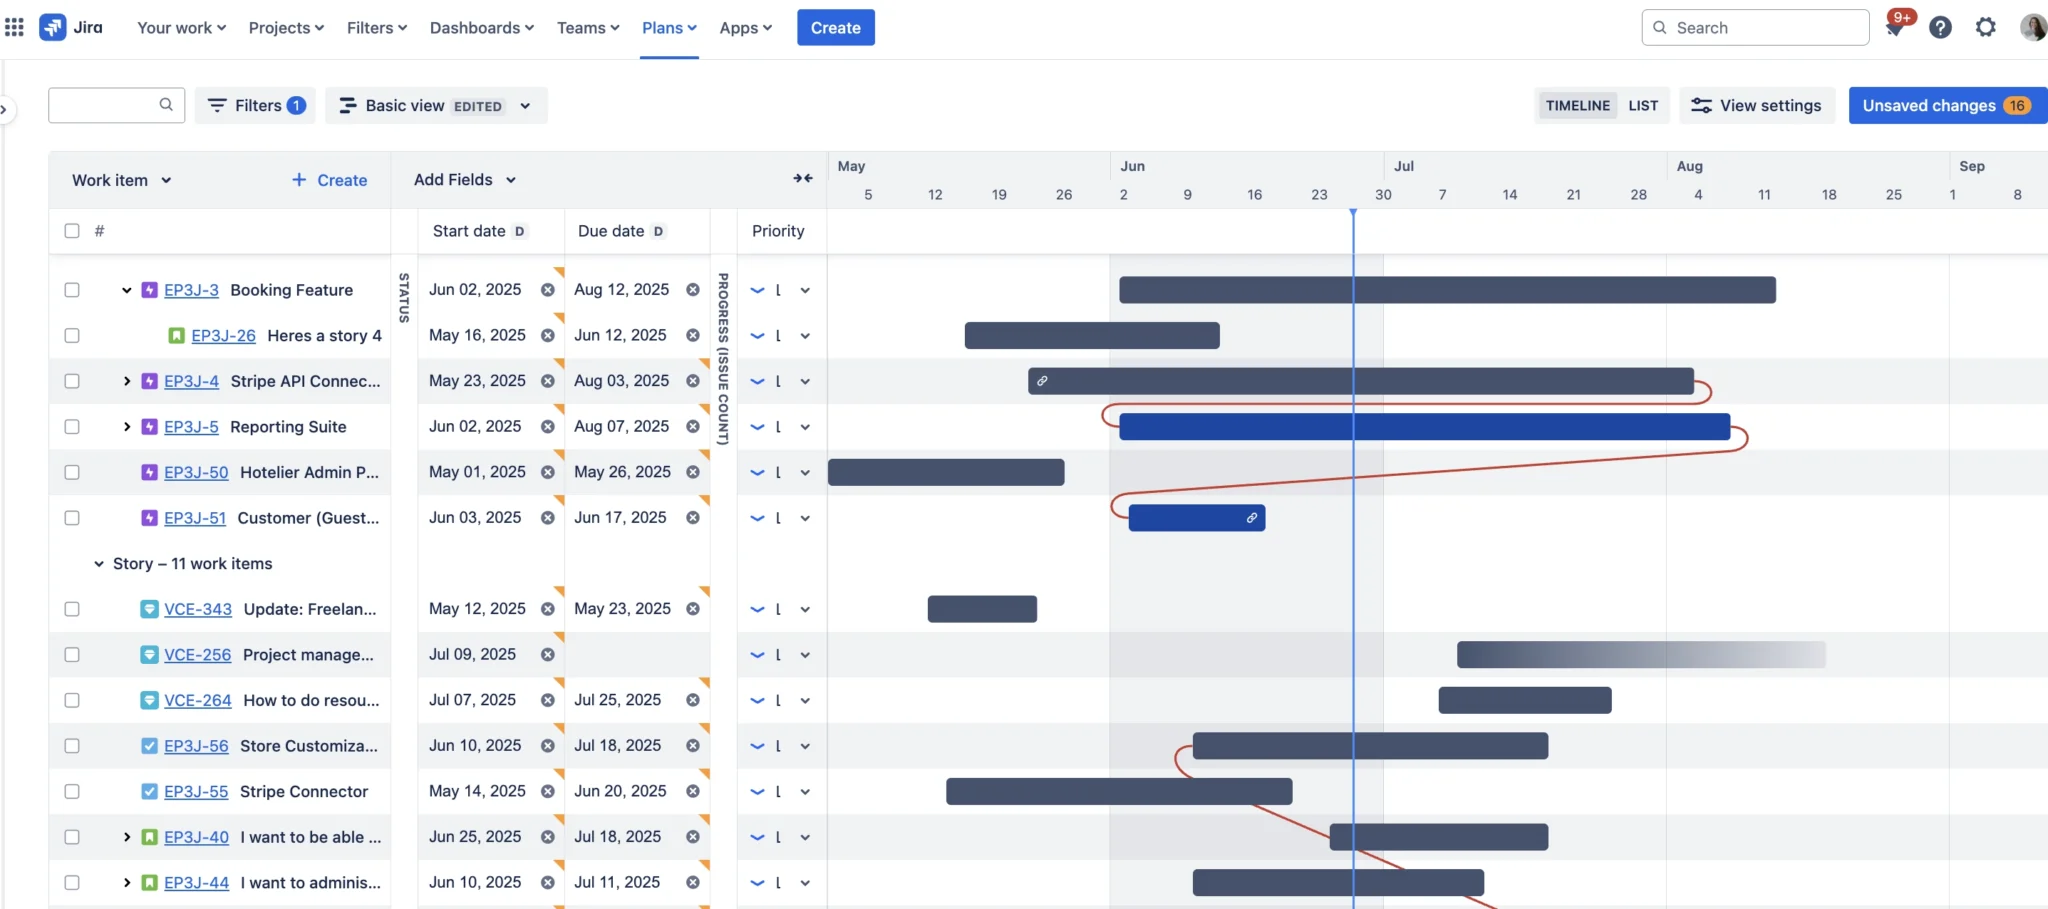
To the Right of Fields Are Dates & Dependencies
Note in the photo below how I collapsed the fields I added to this roadmap. I did this so that I can work with main star of the show: the chart itself. The bars span across dates and can even display dependnecies.
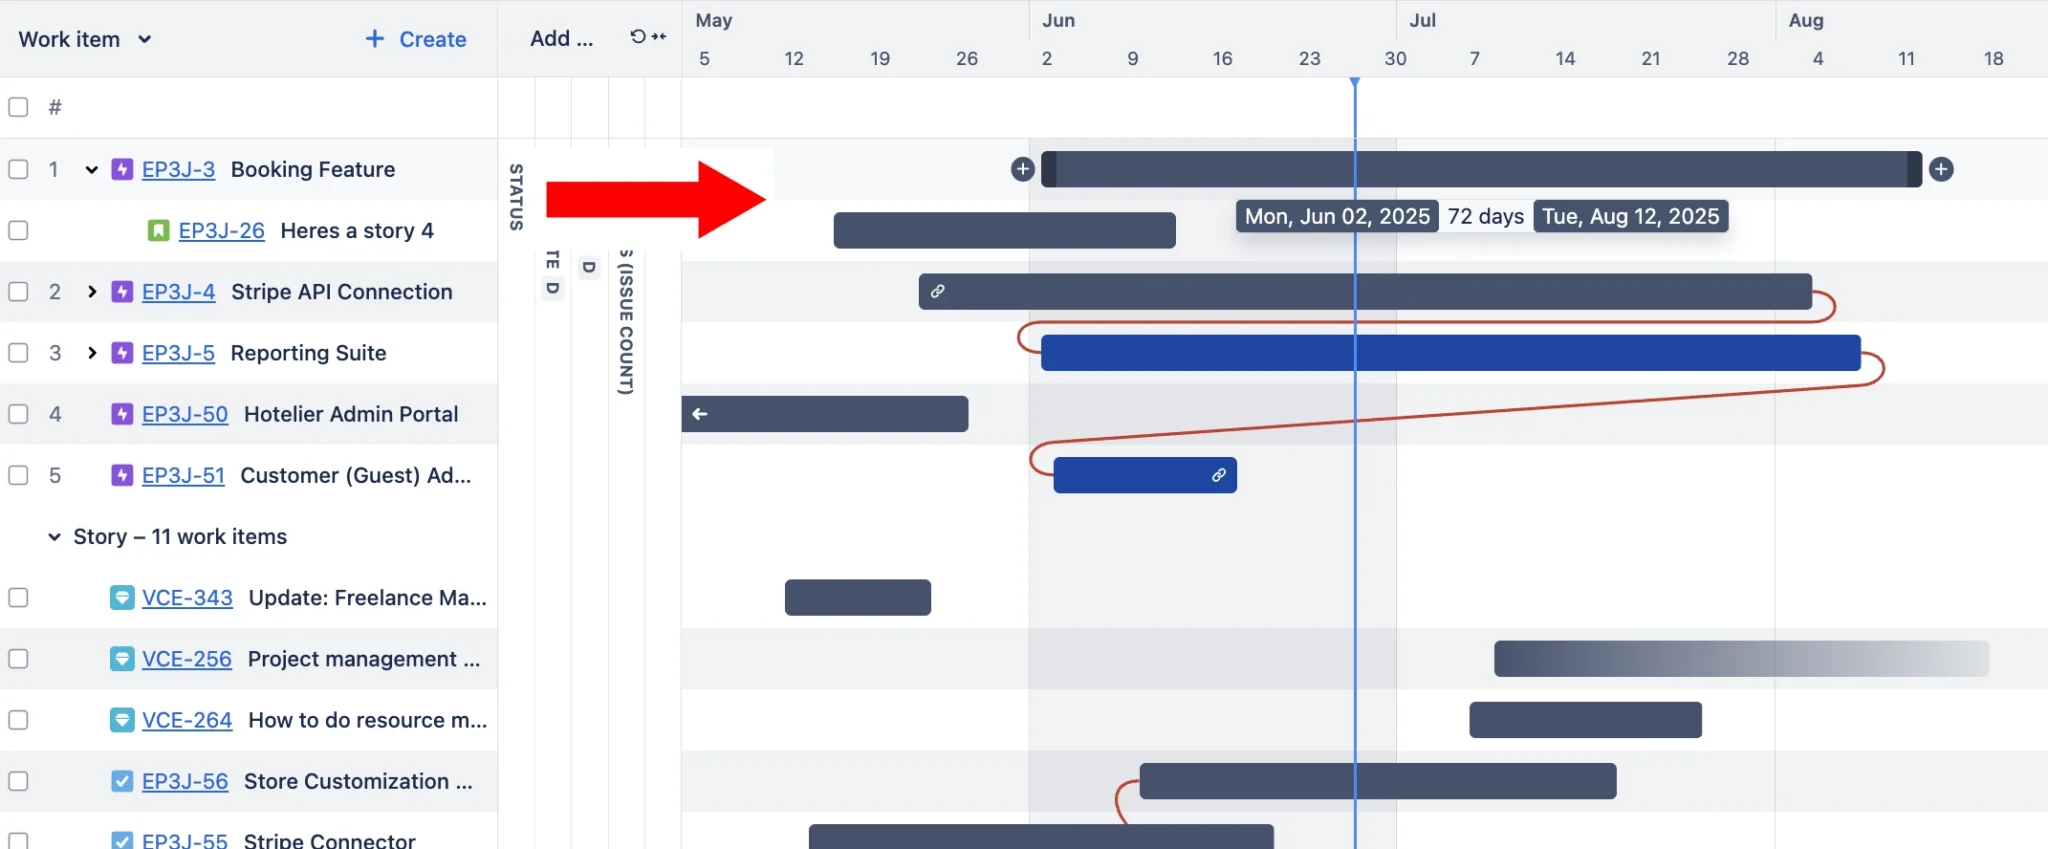
Here are some things to know about how dates work in Advanced Roadmaps:
- The bars represent the dates themselves.
- When you hover over a bar, it will display the actual start and end dates and total number of days between.
- The bars are different colors (based on status). Blue is “in progress.” Grey is “to do.”
- You can drag and drop the dates or add them manually in the date fields (which are to the left).
- Changing dates in a Jira issue will update in Advanced Roadmaps (after you refresh). This is unlike when you make things in Plans (which don’t automatically populate in Issue / Work Type field).
Dependencies 101 in Advanced Roadmaps:
- Many people (myself included) feel that it’s easier to create dependencies in Advanced Roadmaps (rather than the Jira issues themselves) because you get a holistic view.
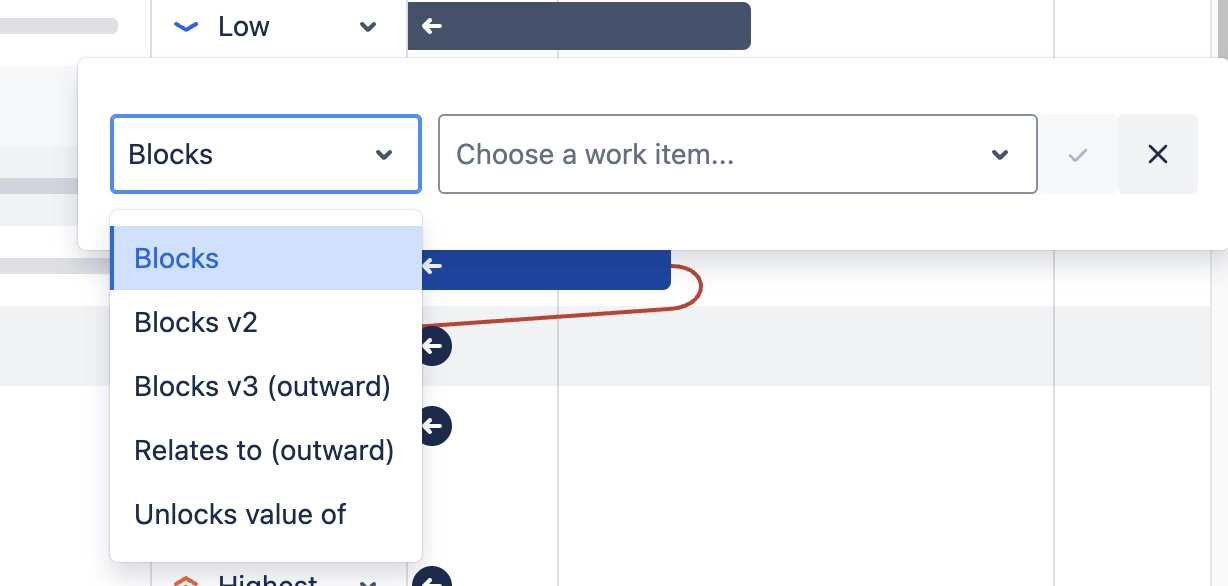
- To create a dependency, hover over a bar and click on the “+” sign.
- From there, you will have options for the type of Dependency you want to create.
- Blocks are the most popular Dependency-type, but you also have these options:
More Setting Options for Advanced Roadmaps
If you want to change things like the name of your Advanced Roadmaps, the dates used to plot your roadmap, or more, click on this carrot on the left of your screen. When it expands, you’ll get a bunch of options:
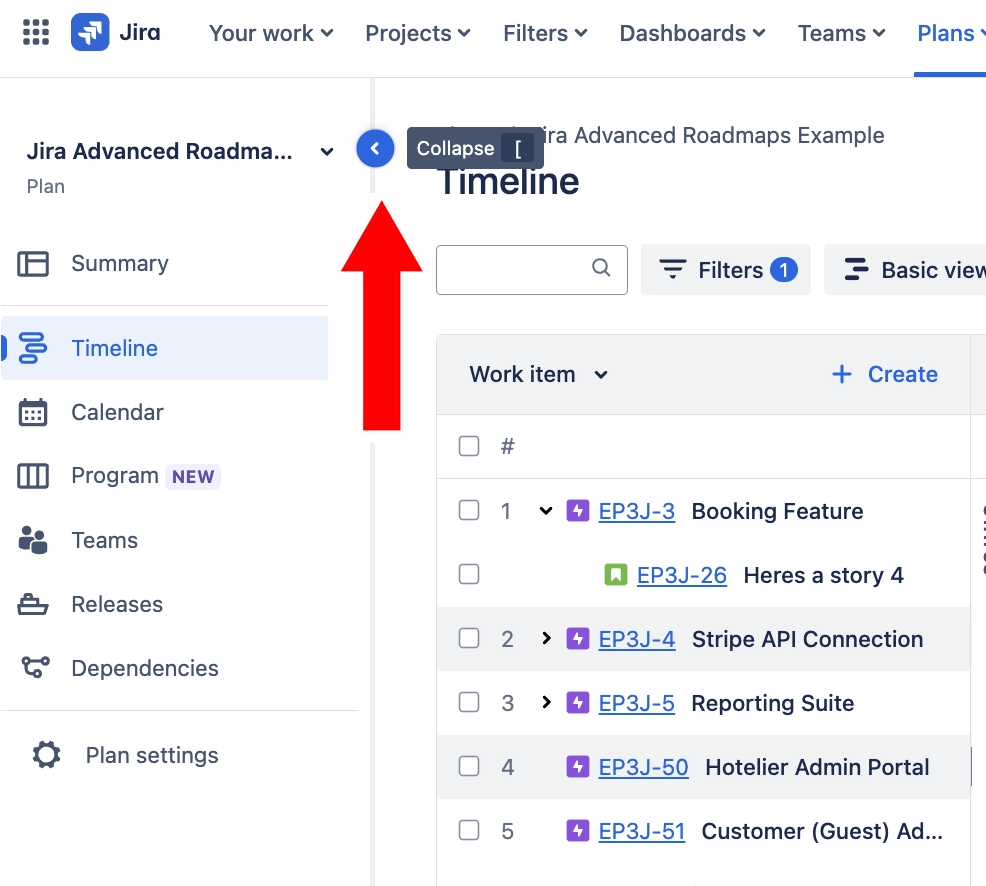
Once you hit “Plan settings”, you’ll be able to do a lot, such as:
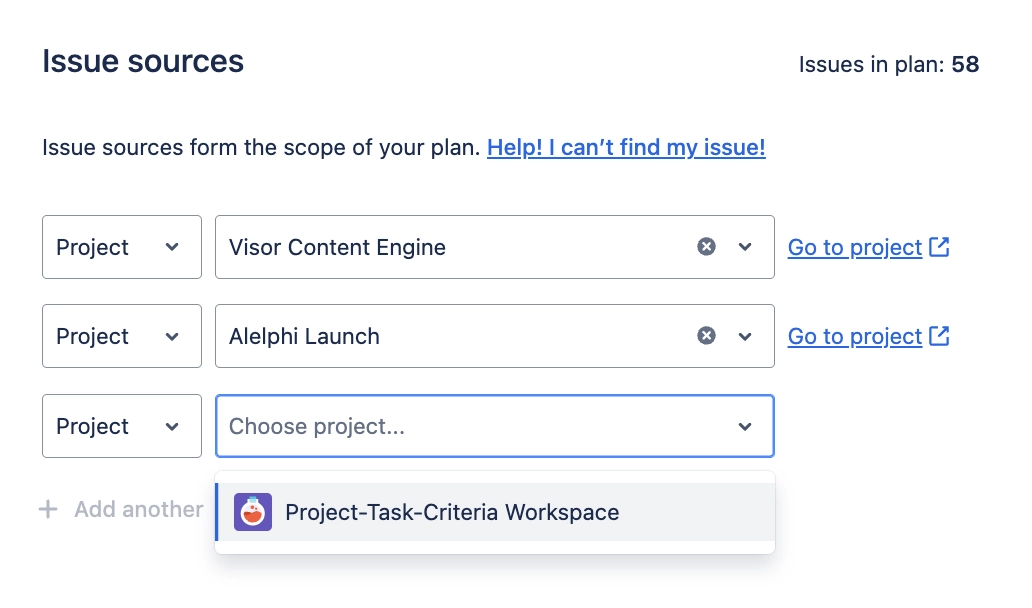
- Remove and/or bring in additional projects or boards (under “Work Items sources)
- Change your Advanced Roadmaps name (under Plan Info)
- Change key estimation / date options for your roadmap (under scheduling)
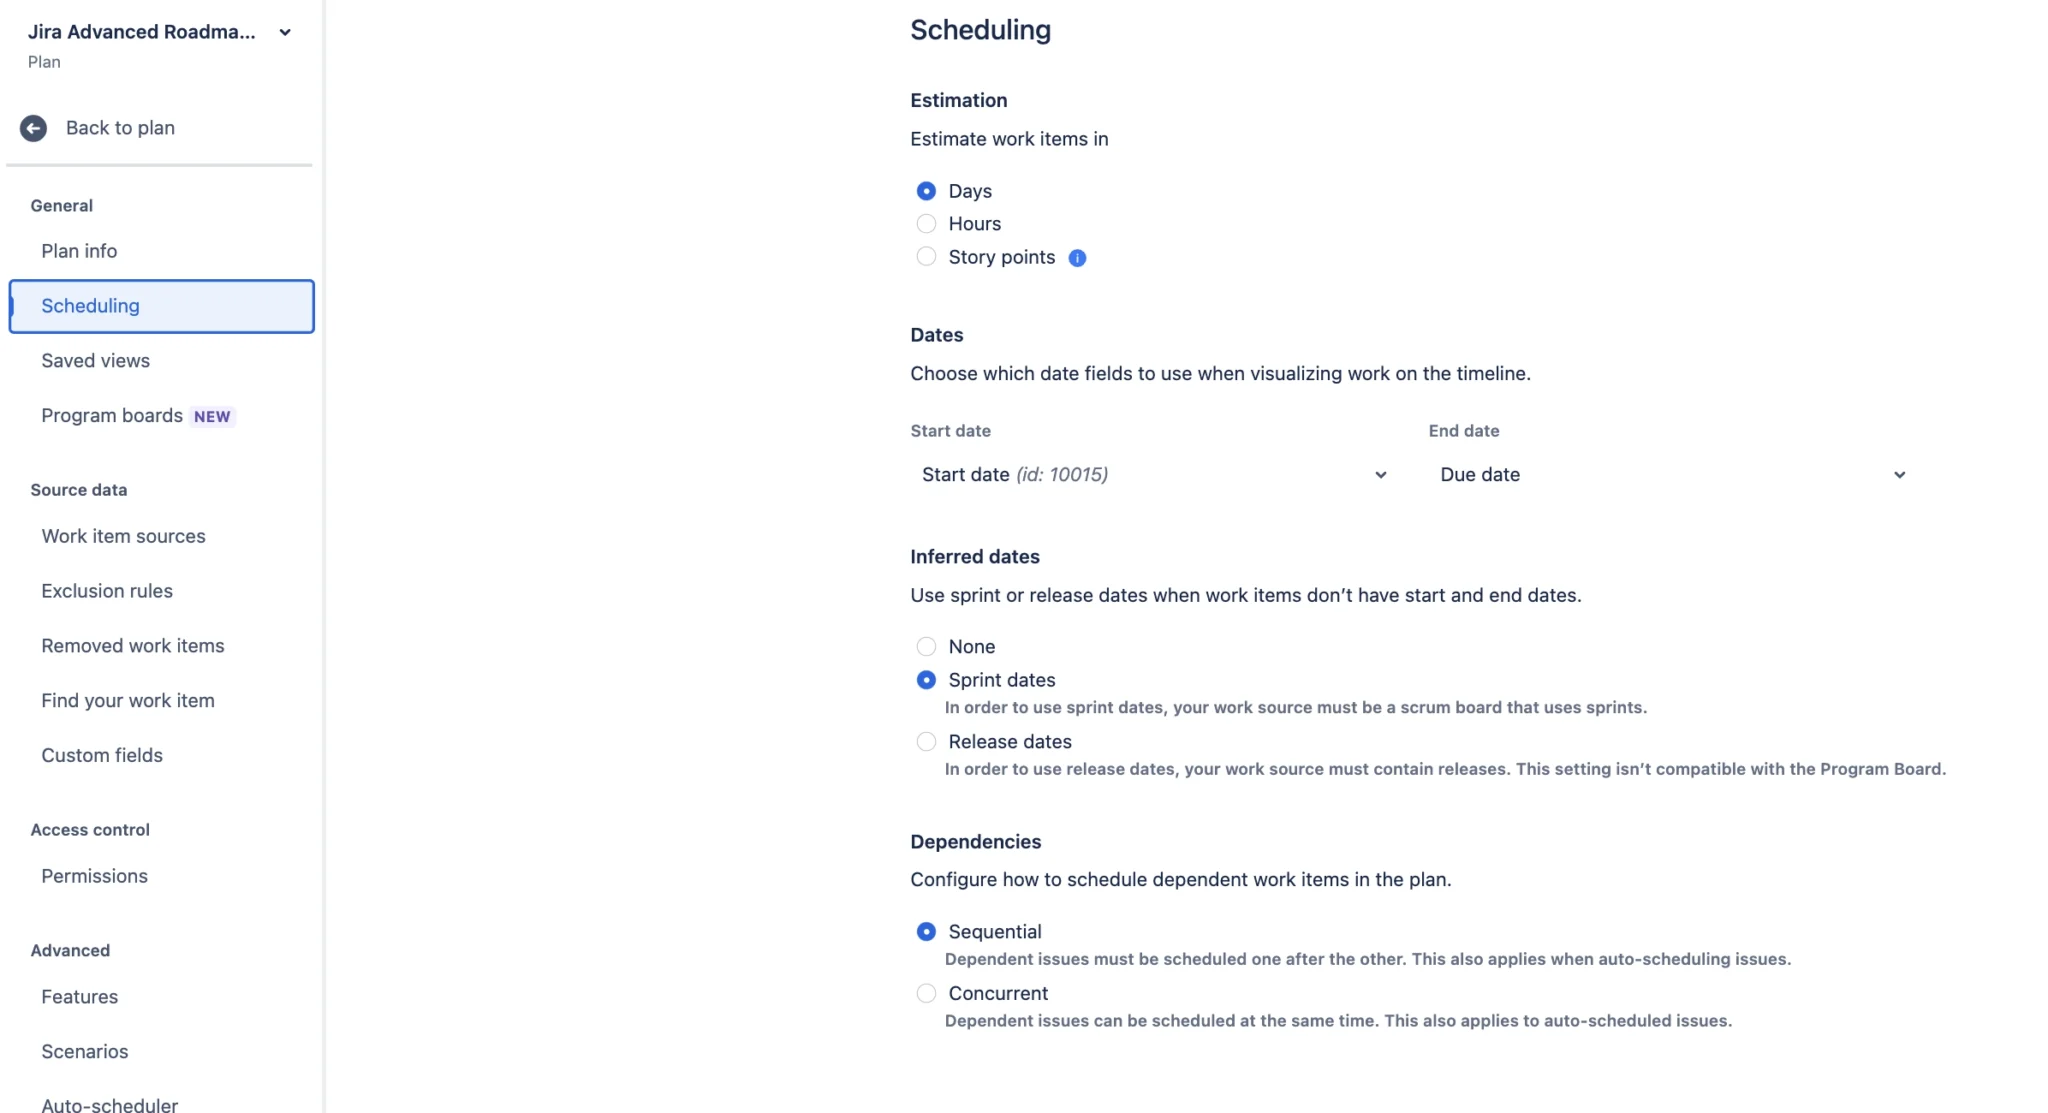
In this scheduling area, you can:
- Change estimation to story points (great for agile teams), as it doesn’t default as such
- Select the date fields you want in your roadmap (e.g., start & end or estimated date fields)
- Choose selection for inferred dates (Jira will use sprint or release dates when there are no start & end dates)
- The type of dependencies you want (sequential or concurrent)
Additional Settings in the Roadmap’s Interface
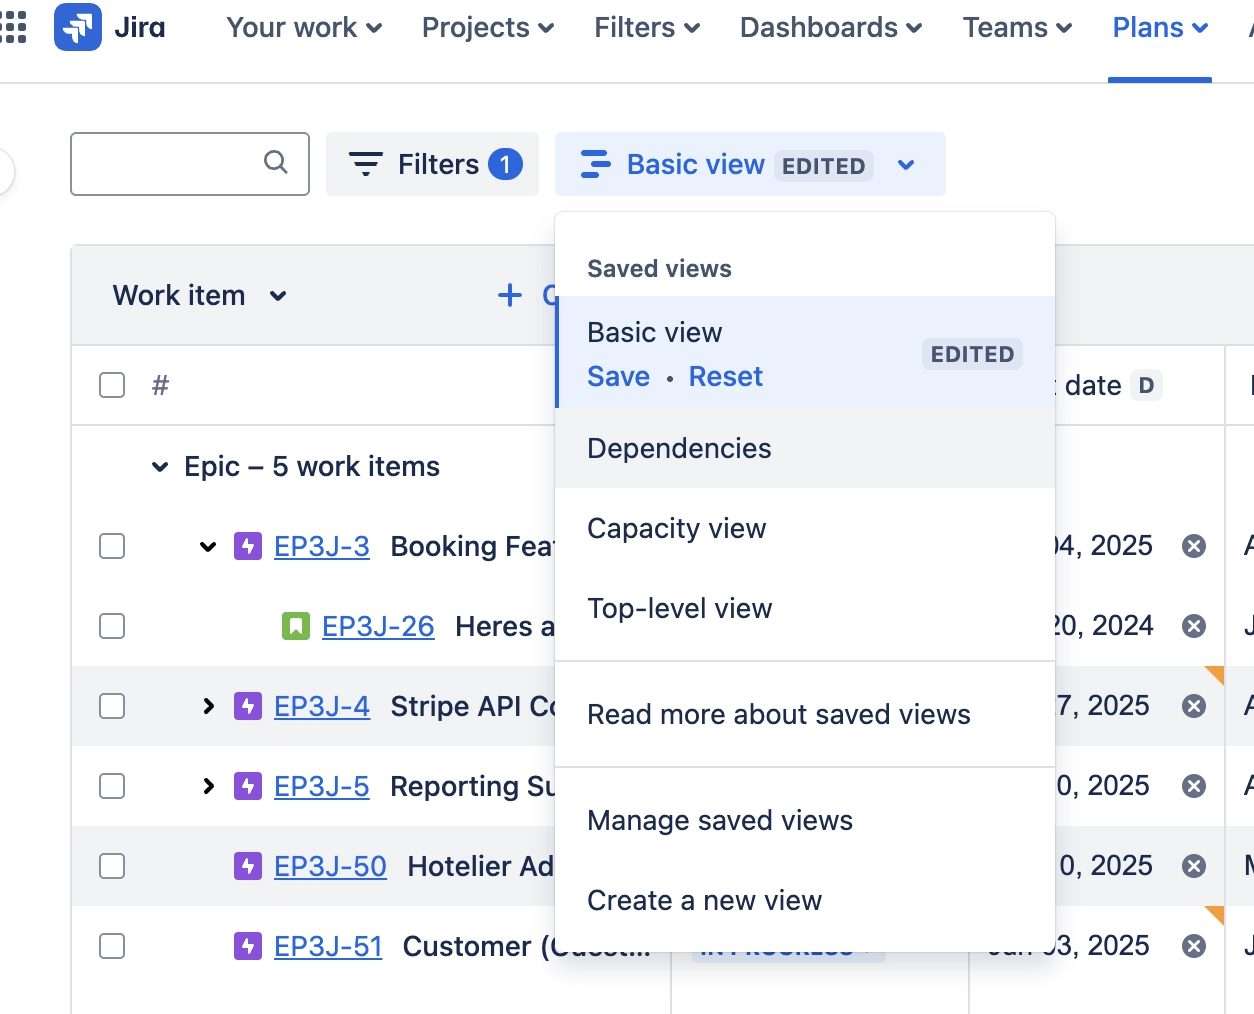
There are a lot of features I didn’t go into depth there. But just know you can also do things like choose the roadmap view you want. Basic view is the main view I’ve been showing but you can also show just dependencies, display a capacity view, and more.
In addition, you can select “View Settings” to do things like change what field decides the conditional formatting for your roadmap’s bars, along with rollups.
View Settings in Jira Advanced Roadmaps allows various settings & configurations:

And in the bottom-right of your Advanced Roadmaps, you can display whether you want your roadmaps zoomed in (e.g., sprints and months) or out (e.g., quarters and years).
Once your roadmap is ready, you can do a lot to make it work just the way you please. And if you can’t, there are plenty of Jira portfolio plug-ins in the Atlassian Marketplace to help enhance Jira’s roadmapping features.
Conclusion: Jira’s Advanced Roadmaps Is a Powerful Planning & Communication Tool
Hopefully this post helped you see just how effective Jira’s Advanced Roadmaps (AKA: Plans) are for seeing all your Jira projects in one place. Managing many projects is not easy feat and a multi-project roadmap can help you immensely.
While Jira’s built-in Advanced Roadmaps is a powerful tool, it’s also not without its limitations. If you don’t want to upgrade to Jira Premium for this feature (and doubling your bill in the process) or found some of Advanced Roadmaps’ missing features (e.g., milestones, external sharing, lack of color-coding options, and limited rollups) to be lacking, then try Visor.
Visor makes it easy to visualize all your Jira projects in one place and then share them with anyone. But don’t take our word for it! Just check out our the glowing reviews about us in the Atlassian Marketplace.
Jira Roadmap created in Visor: