
3 Ways to Run a Jira Export to Excel (+ Video Tutorial)


Start using Visor today
- Visualize all your projects and data

- Roll up multiple projects into portfolio views
- Try Visor for FREE
You might need a Jira export to Excel for several reasons. You may want to share data with colleagues or external stakeholders who don’t have access to Jira; spreadsheets can work as a way to give Jira guest access to project data. Alternatively, you might want to manipulate or calculate the data in a spreadsheet and outside of Jira.
Whatever your reason for wanting to export data to a CSV, this article has everything you need to know about getting Jira data, boards, backlogs, and more into Excel. Start working your spreadsheet magic on that Jira project data with these tips!
In this article, we’ll cover:
- How to export from Jira to Excel
- Limitations to consider when exporting from Jira to Excel
- Other (smarter) methods to get the same or better results than exporting to Excel
- Whether you can export more than 1000+ rows of data to a spreadsheet
If you’ve tried exporting to Excel and found it disappointing, you can check out other options to create Jira spreadsheets to see if one of those options works better for you. We’ll cover those as well.
We’re Visor, a project portfolio management tool designed to give you a bird’s-eye view of all your Jira projects at once while still allowing you to manage each one on a granular level. It helps all your data stay in one spot, even if your team uses different tools. Try Visor out for free.
Can you Excel get data from Jira?
You can get Excel data to Jira, but it’s not a straightforward process. Though there are Jira Excel integrations in the Atlassian Marketplace, these usually work in only one direction – from Jira to Excel. Some Marketplace apps also have reviews complaining about unresponsiveness and errors.
If you’re a project manager who uses Jira frequently, you’ll be familiar with this struggle.
The most common way to get information from Excel to Jira involves downloading a CSV from Excel and uploading it into Jira. (You can jump to a description of this process in the section below.)
That said, there’s a big catch to any Jira export to Excel. The information only flows one way, and spreadsheets are static. That means that you risk having stale data from the moment you export since you won’t be able to keep the spreadsheet updated automatically. Every change to Jira you want to see reflected in Excel becomes fully manual. If you’d like to have a two-way sync between your spreadsheet and Jira, there are easier ways to go about it. Consider an alternative solution, like Visor.
A fully integrated Jira data roadmap in Visor
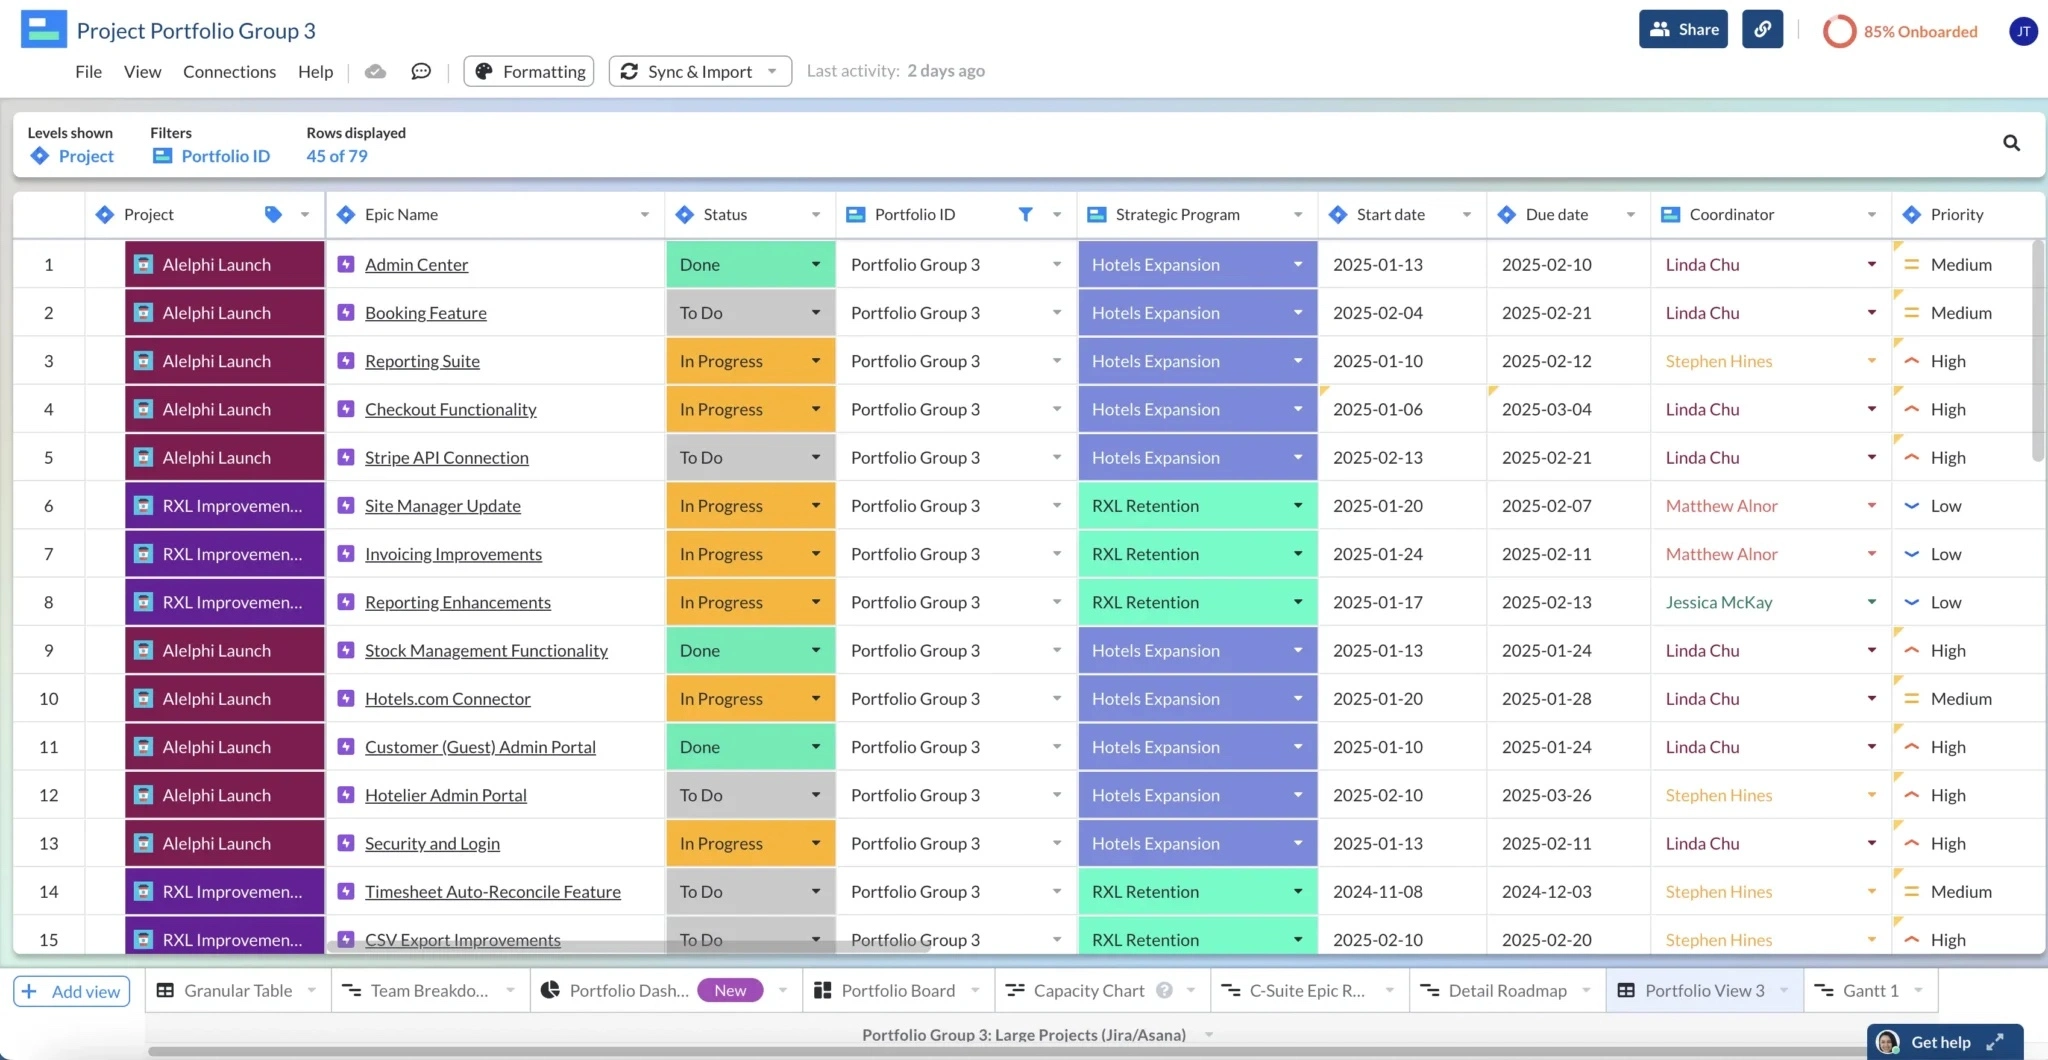
Visor gives you a spreadsheet, roadmap, Gantt, and more capabilities but with a bi-directional sync so that you can enter information in your spreadsheet and have it update Jira as well – no CSV files required. (Although Visor also allows you to export a CSV fill.)
Unlike apps like Jira Cloud for Sheets, Visor’s integration with Jira syncs both ways; this means you can not only import data from Jira but also push data back out. You can also find us in the Atlassian Marketplace.
Why export Jira data to Excel?
Exporting your Jira data to Excel has many benefits. As powerful as Jira is, there are some things you can’t do in Jira and others you might not want to do. Here are some key benefits of taking your Jira data to Excel:
Gain insights and analyze data
Sometimes, you just need to see things differently. Our brain loves putting things into boxes, which Excel does exceptionally well. By exporting your Jira data to Excel, you can then leverage all the various strengths and formulas Excel has to offer to see and analyze your data differently.
Format your Jira data to tell a story
Jira is great for tracking tasks and progress on software projects, but occasionally, you need a little spice to turn that information into a story people can get behind. Seven completed Sprints don’t carry the same weight as “100s of tasks done” to someone who doesn’t know what a Sprint is. T
aking your Jira data into something like Excel allows you to filter, format, and manipulate data in a way that tells the story you want to tell and shows just how impressive your progress is.
Because Jira’s List View is limited
While Jira does offer a table view, which it calls list view, it doesn’t have a lot of the functionality that many spreadsheet users want or need. Jira expert, Alex Ortiz, dives into Jira’s List view (and uses Visor as an alternative) in this video.
Share data with non-Jira users
Sharing Jira data with people who are unfamiliar with Jira or do not have a license is occasionally necessary. Exporting your Jira data to Excel allows you to share this information with people outside of your organization or even those internally who do not have a license or familiarity with Jira to get the most out of the data in the product itself.
Other tools, like Visor, also make it easy to share Jira data with external stakeholders.
How to Export a Jira Backlog to Excel
You can export your Jira backlog, though you’ll be exporting it as a CSV that you can then import to Excel. Here’s how to do it:
Step 1: Select your project
From the Home screen, open the project you want to export the backlog from.
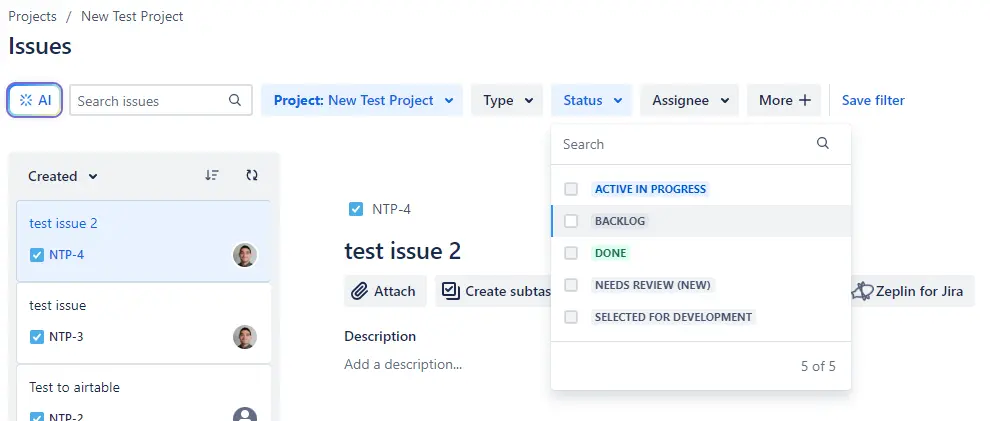
Step 2: Find the issues you want
Click on Issues. Once you’re on the Issues tab, click on “Go to Advanced Search” and filter your issues so that you only see the backlog using Backlog filter in the Status dropdown menu.
Step 3: Export the backlog
Once you’ve filtered down to the issues you want to export, select the Export Issues dropdown menu towards the upper-right-hand corner of the screen. Select Export Excel CSV. The file will download.
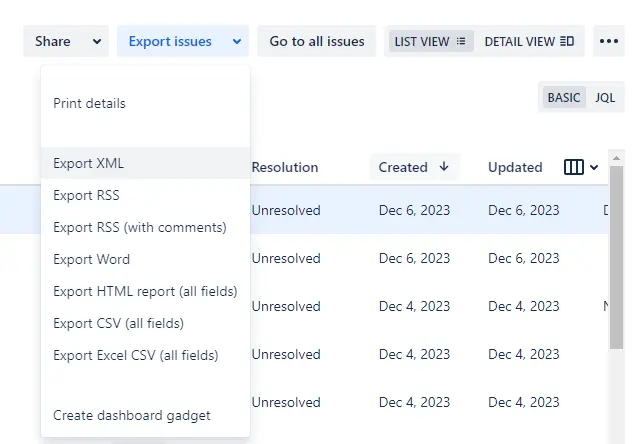
You may see an option for “Current Fields.” This means Jira will only export data that is currently visible on your Issues page. The “All Fields” option will export all data related to each issue in the backlog.
Bonus Pro Tip: You can export your backlog with Visor’s spreadsheet and download it as a CSV. In addition, you can prioritize, edit, and groom your Jira backlog with Visor’s bi-directional Jira integration and Jira spreadsheet.
How do I export more than 1000 issues from Jira to Excel?
Jira has an export limit of 1000 issues at a time. However, there are a few workarounds. For instance, you can:
- Set up a Jira Excel integration and export Jira data directly to Excel. You should see a small Excel icon once the integration is set up that will trigger a transfer of your filtered issues. However, reviews for the integration indicate it can be a slower option, and I can confirm this based on my own testing.
- Send out Issues in groups of 1000 using the pager/start URL parameter described on Jira’s Software Support page. The page also offers an automation that can be done if you use an API key for authorizations.
- Use an app like Visor (more on that below)
Limitations When Exporting Jira Data to Excel
As crucial as the ability to export Jira data to Excel is, there are a few things to consider when choosing to do so. If the following constraints aren’t dealbreakers for you, then check out our guide for exporting a CSV in Jira in the following section of this article. However, if Jira’s built-in CSV export option is too limiting for your needs, then check out how to get your Jira data into a spreadsheet using Visor.
1. You can’t export more than 1000 rows of data in Jira
There is a limit to the amount of data you can export — 1000 rows of data. If you’re looking to export multiple projects or a larger dataset, remember that you might have to do more than one export and combine sheets to get the comprehensive overview you want.
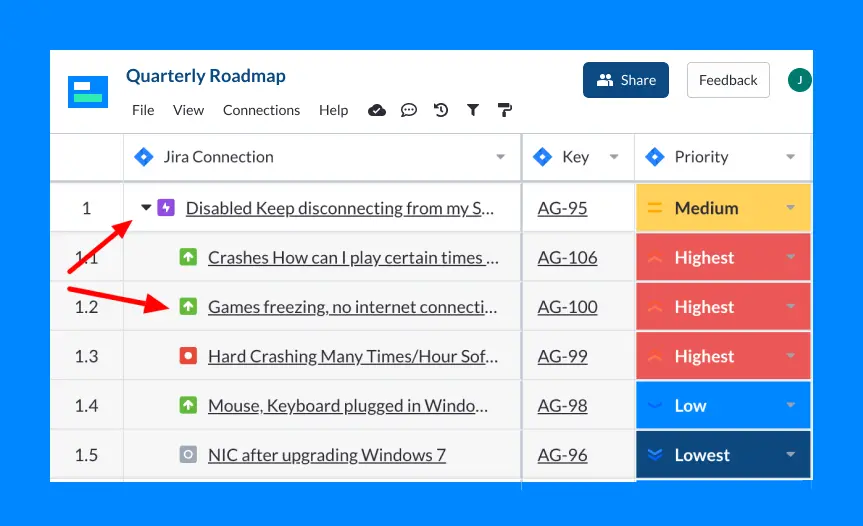
2. You often lose sight of parent-child relationships
While the parent-child relationship visualization is great in Jira, these relationships are not visible on export. You will be able to see each exported issues type (Epic, Story, etc) but the actual nesting that occurs in Jira will not be present on your export. Each issue will surface the same way–as a row.
3. You might spend a lot of time cleaning up data
When exporting your data from Jira, you will see a spreadsheet with a lot of columns for fields that might be irrelevant to you. This could require you to clean up your dataset before actually getting to work analyzing and formatting your data.
4. Data in your Excel spreadsheet can quickly turn stale
Unless you manually update the data in your spreadsheet to reflect changes in Jira, your exported Excel spreadsheet will quickly have stale data. Or you’ll have to create another export to have that changed data present. It will not happen automatically. This can cause confusion around what dataset is actually accurate. For this reason, Jira and Google Sheets integrations are a popular alternative to Excel.
5. Editing data in your spreadsheet won’t be reflected in Jira
If you make any changes to your data in Excel or CSV upon export, keep in mind that these changes won’t show up in Jira (unless you manually update Jira). This means you will likely be doing the work twice or risk having two conflicting data sets.
3 Ways to do a Jira Export to Excel: Overview
Below, we unpack three options for exporting data from Jira to Excel.
- The first option involves using Visor’s Jira spreadsheet. Visor stays in sync with Jira, ensuring that nested Jira data stays accurate when shared with stakeholders. Visor offers bi-directional syncing with Jira and offers a CSV file download.
- The second option involves downloading a CSV file in Jira. While simple, this option can result in many different versions of the same dataset flying around an organization; downloaded data doesn’t stay in sync with Jira and can grow stale quickly.
- The third option involves a Jira export add-in that appears in Excel. While Jira Cloud for Excel is an Atlassian app, it also has it fair share of user reviews complaining about the app’s unresponsiveness.
Decide which option is right for you, and then go to the corresponding tutorial below.
Option #1: Export Jira Data to Excel using Visor
If you want a more automated way to keep your spreadsheet data in sync with Jira, then Visor’s spreadsheet is for you. Visor integrates with your Jira instance and brings your data into a flexible spreadsheet, which you can export into a CSV Excel file.
Quarterly roadmap in Visor, with Jira data
💡 You can also share your Jira data in Visor’s spreadsheet. Unlike a CSV file, Visor honors Jira nesting (e.g., parent/child relationship). In addition, it’s easy to keep Visor’s spreadsheet updated with your most recent Jira data. Just hit Visor’s “Sync” button to pull in your most recent Jira data.
Step 1: Import your Jira data into Visor.
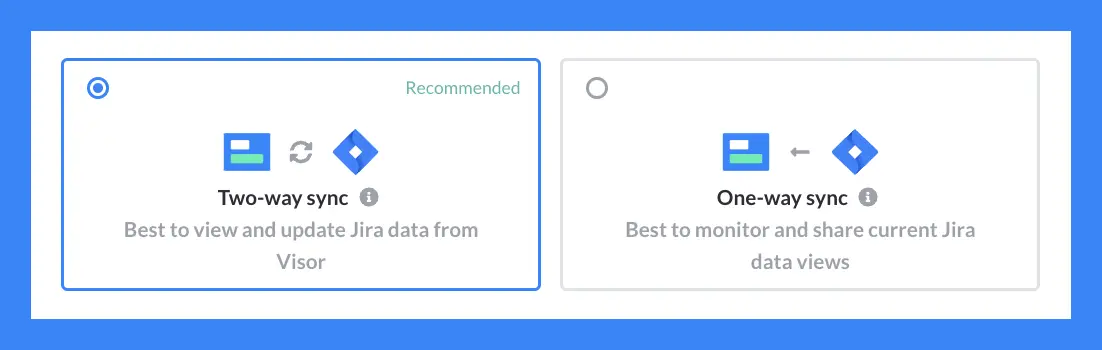
Visor’s Jira integration is easy to set up. You can choose a one-way sync (import-only) or a two-way sync. You can even import multiple projects at once using the advanced JQL importer.
Visor’s Jira syncing options
Importing multiple Jira projects in Visor is easy. Here are some advanced directions:
- Open the Connections menu and select the Jira icon
- Click on Sync & Import
- Click on Configure Default Import Filters
- Click on Switch to JQL
- Just type in your query (which can include multiple project keys) – or paste a query generated from Jira if you don’t feel confident typing
- Preview the Jira issues targeted for your import
- Hit Import and watch the magic happen
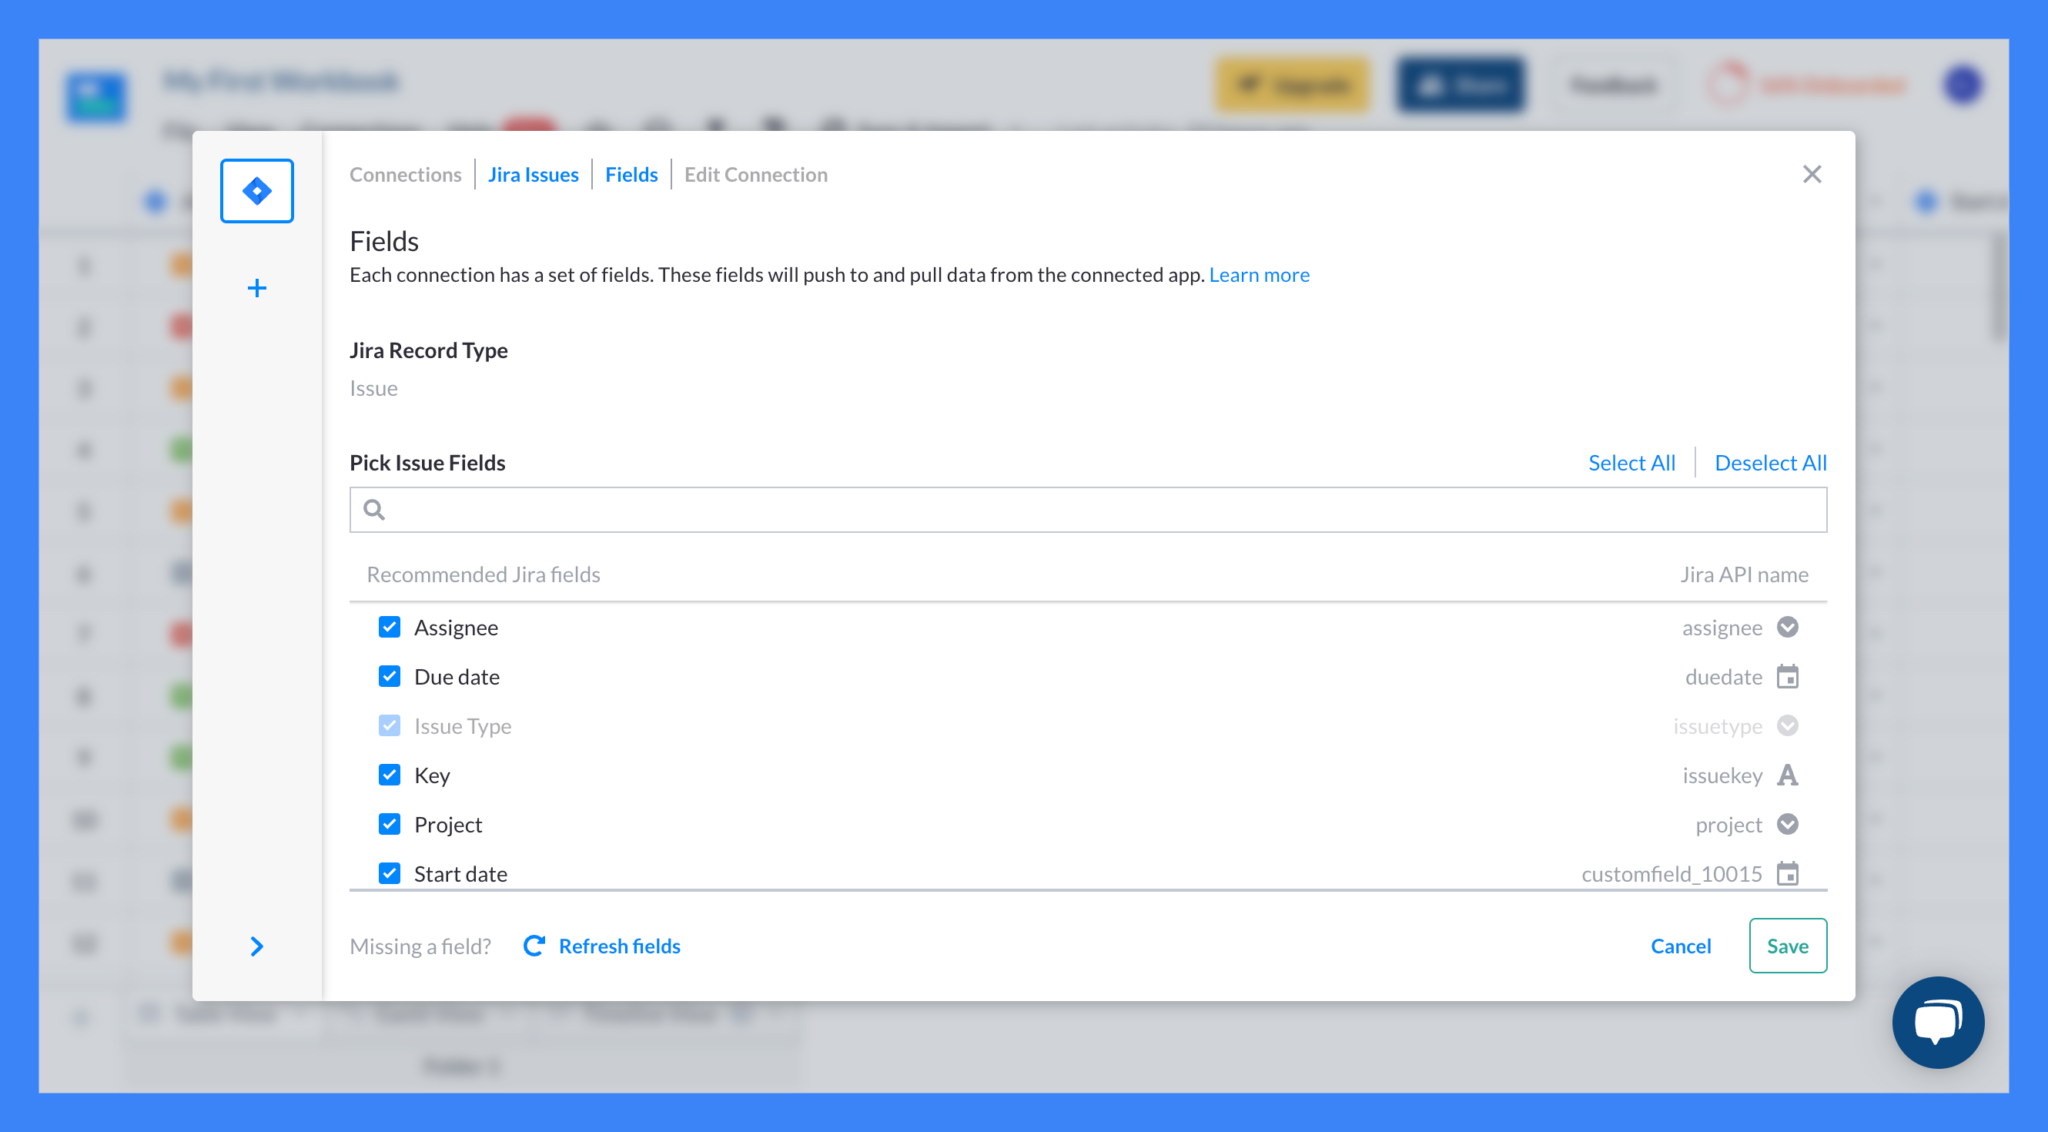
Step 2: Search and select the fields you want to import & export
When exporting a CSV in Jira, you have to export all fields, even empty ones. Visor, on the other hand, lets you select from 70+ supported Jira fields, including custom fields. This allows you to avoid needing to clean up your data later.
Jira Field selection in a Visor import
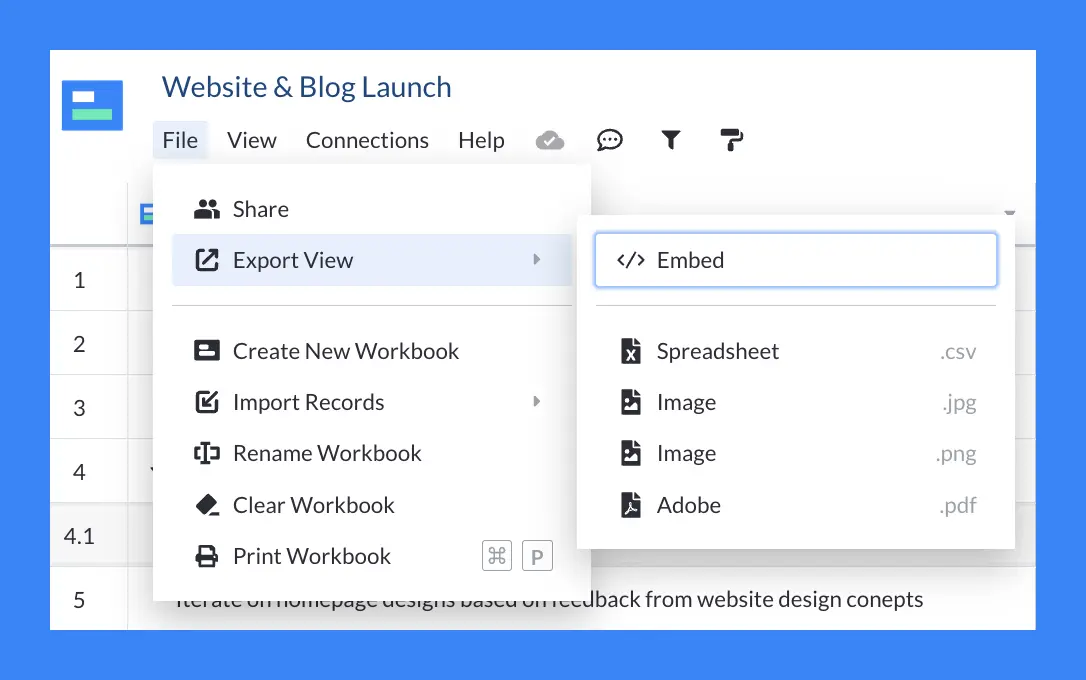
Step 3: Export a CSV of your Jira in Visor
Once you have your data organized the way you like it, you’re able to reorder columns, deleted rows, and more so the only work you need to do once your data is exported is share it with the people who care.
Bonus: Avoid sharing outdated Jira data
Here’s the biggest problem with a Jira export to Excel: the date grows stale when you hit export. It will trap you in a cycle of constantly updating and altering the spreadsheets to keep them in sync with your Jira.
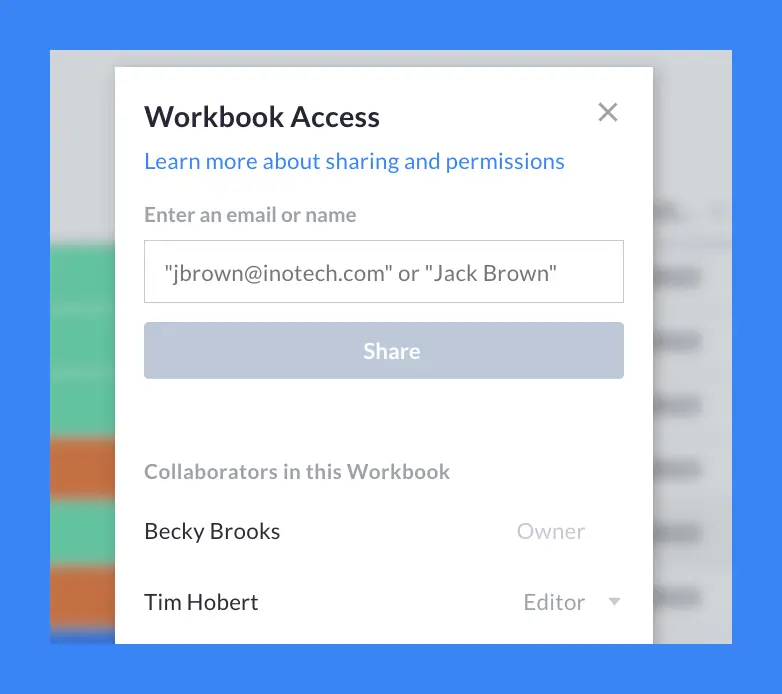
Want to share a spreadsheet that stays in sync with your Jira data? Then, share your data directly in Visor by simply clicking “Share” and entering an email address. Unlike Excel, Visor’s spreadsheet is designed to stay in sync with Jira – and it can push data back if you want, so changes in Visor are reflected accurately in Jira.
Sharing a workbook in Visor
How to Export Jira to Excel Video Tutorial
Visor’s Jira spreadsheet makes it easy to export your most current Jira data into a CSV file. Watch this short video below to learn how. Then, get started with Visor for free.
Why Users Jira Export to Excel using a CSV File with Visor
Visor connects to Jira, allowing users to share a spreadsheet that stays accurate without manual upkeep. However, you can also export your Visor spreadsheet to a CSV. Here are common use cases to export a CSV in Visor, along with a video tutorial.
Clean Up Data Before Exporting to Excel
Unlike a traditional Jira to Excel export, Visor lets you choose which fields you care about upon import. As you go through the import process, you can search and select the fields that matter to you, which means there will be less data cleanup once you export.
Prioritize Your Backlog
Visor also allows you to drag and drop issues into a specific order once your data has been imported. This means you can use Visor to prioritize your backlog and have your data in the order you want it upon export. Exported data will be easier to clean up, given your ability to organize issues in Visor.
Option #2: Export a CSV File in Jira
Step 1: Get to the right spot in Jira
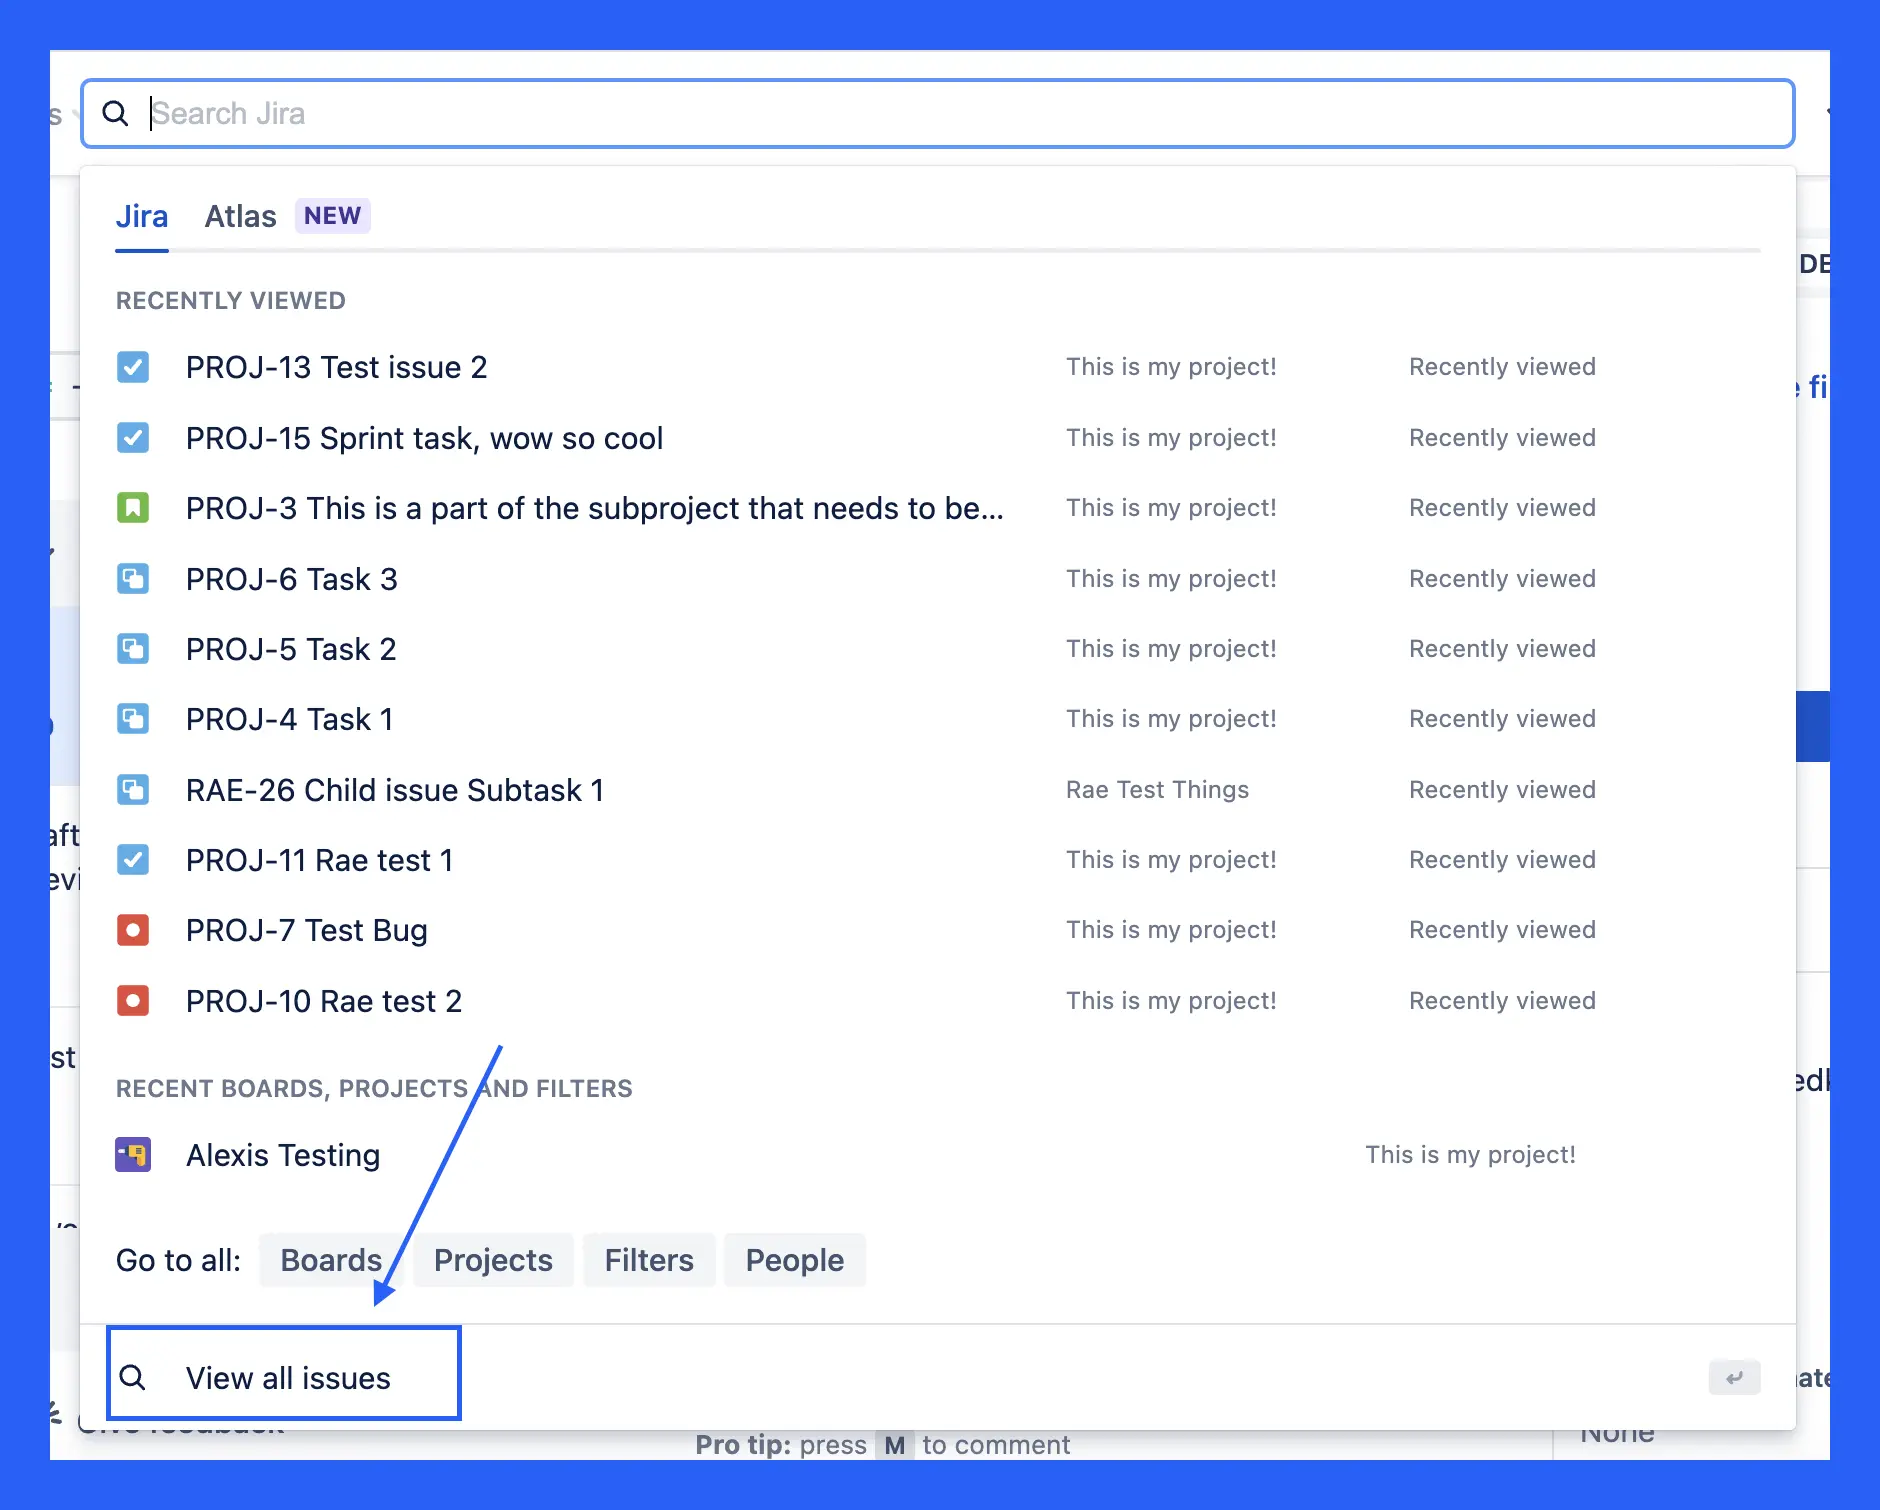
Go to the Search bar in the top-right corner of the screen. Scroll down and click “View all issues.”
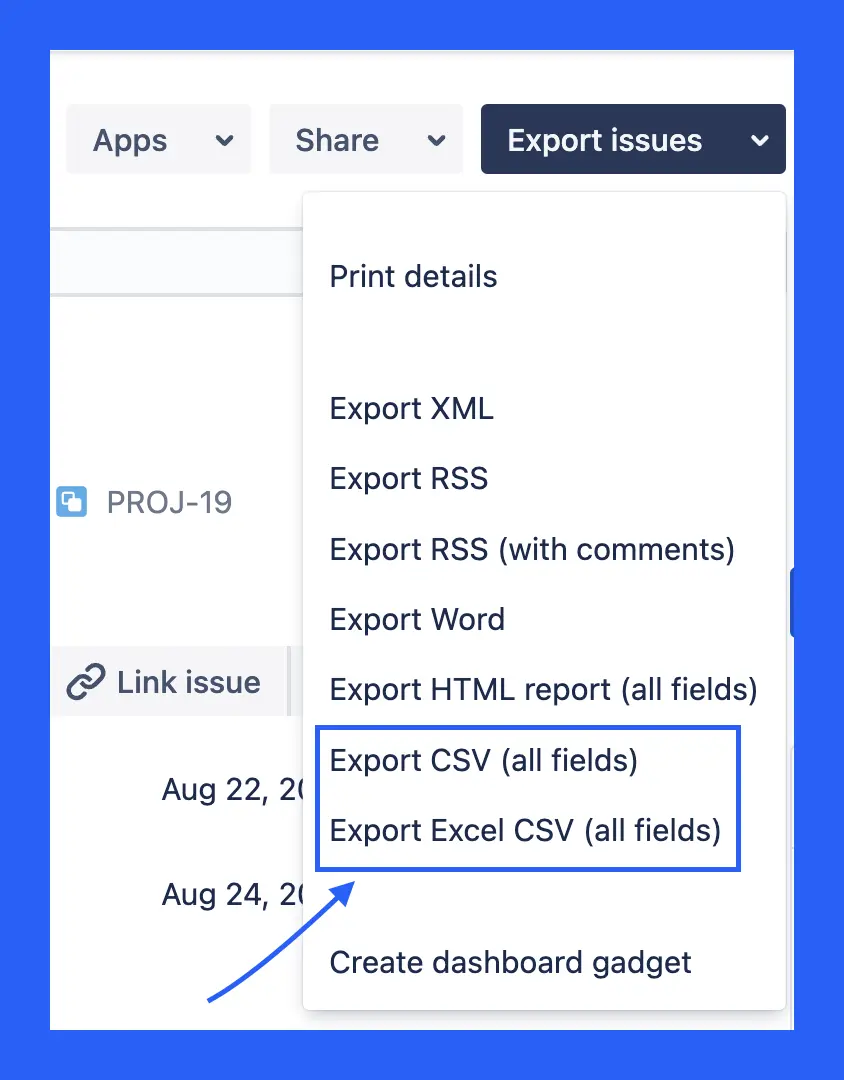
Step 2: Select the Excel CSV export option
Jira allows you to select from multiple export options including XML, RSS (with and without comments), Word, HTML, CSV, and Excel CSV. For this how-to, select either “CSV” or “Excel CSV.” Both options export the data as a .csv file that is compatible with any spreadsheet program such as Numbers, Google Sheets, or Excel.
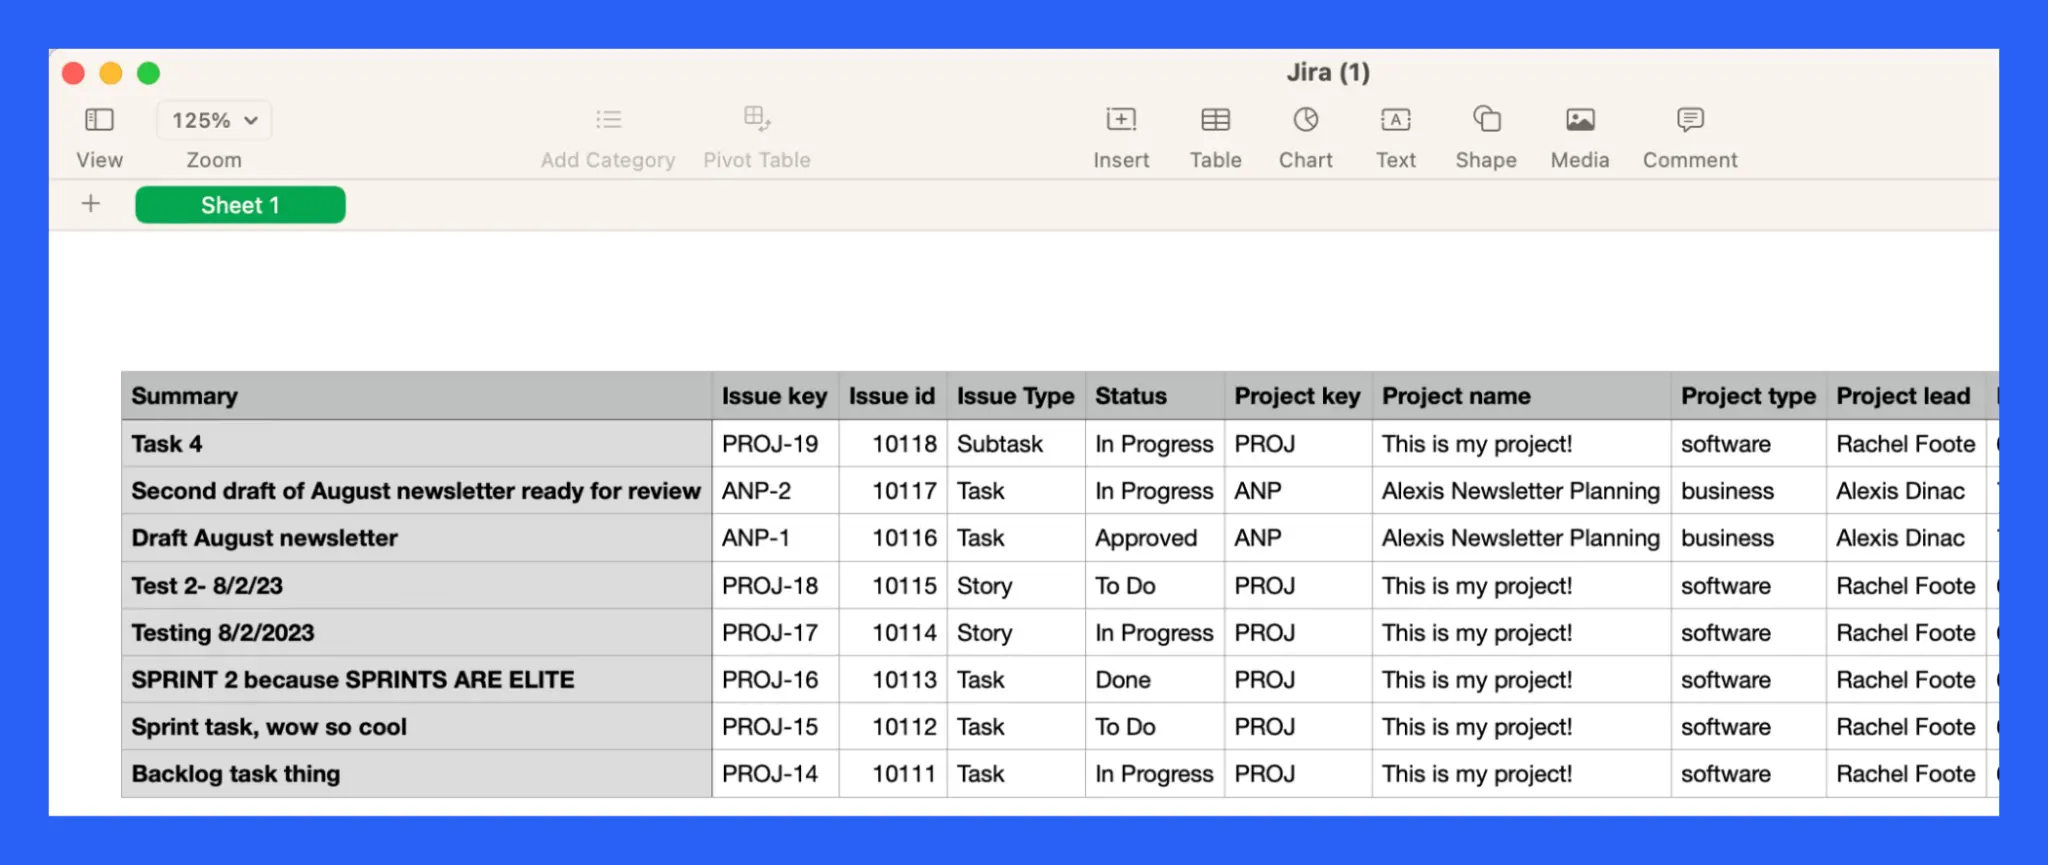
Step 3: Clean up your Jira data in the exported CSV file
You’ll notice that exporting your Jira data to a .csv only includes exporting all fields. This means that there will be several empty fields upon exporting your data that you might want to clean up. You can do this by mass-selecting columns, right-clicking, and selecting delete to get rid of the empty columns in most spreadsheet software. Holding Ctrl (Command for Mac) and selecting non-sequential columns to delete is also an option.
Bonus: Export Specific Fields With JQL
You might want to export a specific portion of your Jira data to Excel, like an individual sprint or your backlog. It’s simple using JQL! Go to the Search bar in the top-right corner of the screen. Scroll down and click “View all issues” as outlined in step one. Here, instead of heading straight to the Export button, you’ll drill down what data you’re looking for using Jira’s query language, JQL. You can sort issues by create date, label, assignee, and more!

Need help with JQL? Our JQL Cheat Sheet will get you up to speed.
Option #3: Export with the Jira Cloud for Excel Integration
If you want to skip the CSV, you can do that by using a Jira Excel integration. Though there are a variety of apps on the market, we’ll be discussing how to install the official Atlassian Jira Cloud for Excel app.
Step 1: Open Excel
Once in Excel, go to the Home menu and select the Add-on button.

Step 2: Authorize the Add-on
After you click on the Add-on button, a Jira Cloud popup will open. Click “Get Started” to begin connecting the two applications. A code will appear. Write the code down since you’ll need it to continue. Then click Get Started, and you’ll be taken to a new page.
Next, you’ll see an Oath approval screen. Choose your preferred site and approve the integration.
Ready to get started with Visor?
If you’re looking for a Jira export to Excel that saves you time and effort, look no further than Visor. You’ll be able to manage every project in your portfolio at once while keeping your data synced and fresh forever. Import your Jira data into Visor today to format, visualize, edit, or share your Jira data – and much more.
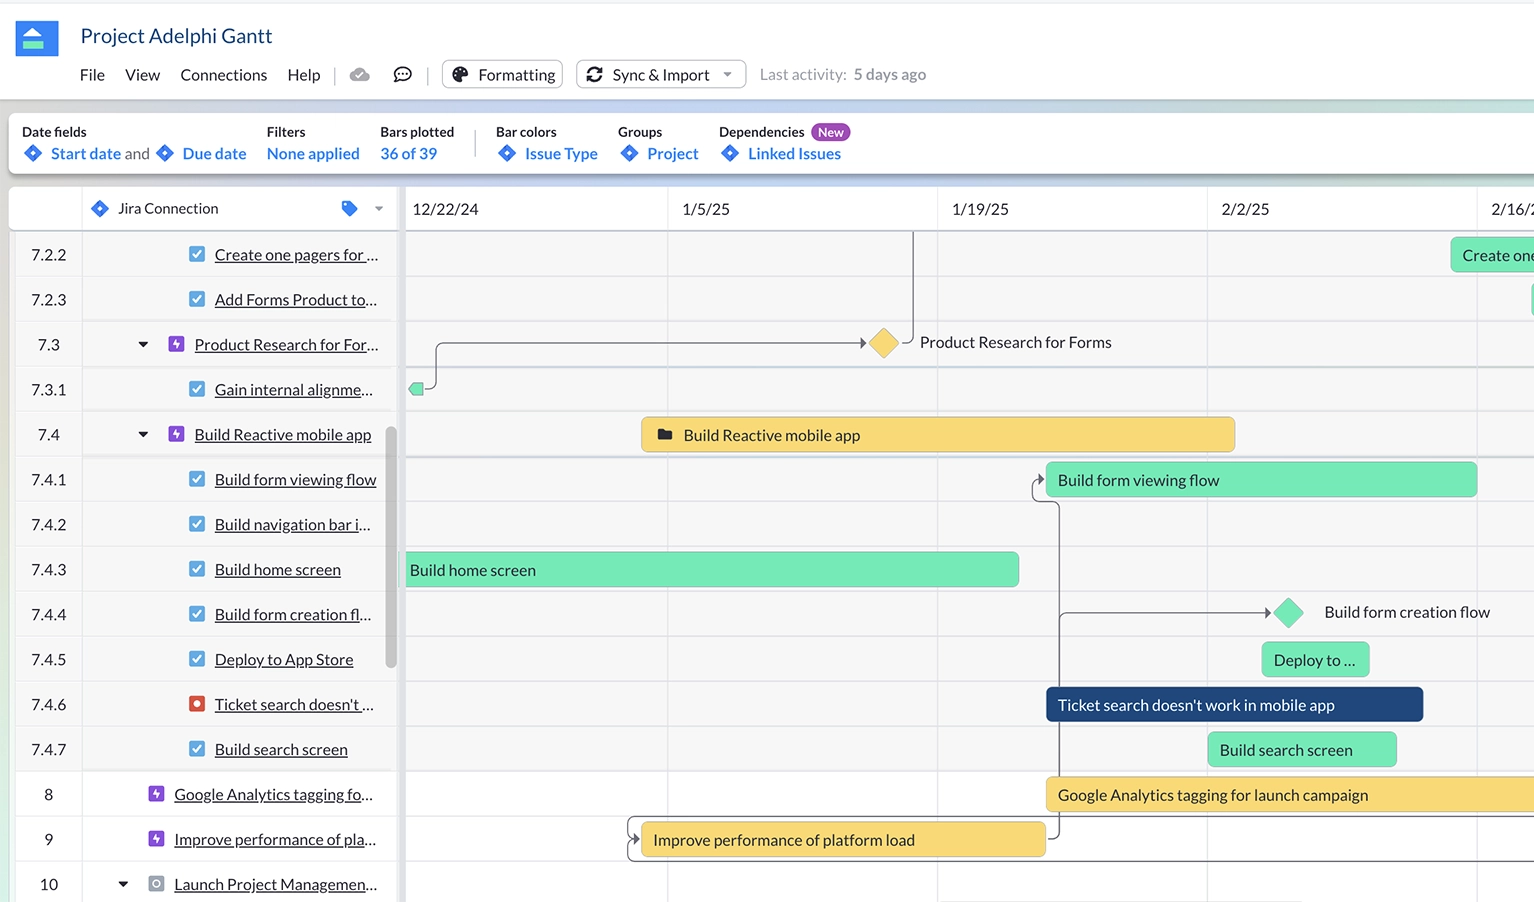
Visor also offers a ton of Jira-friendly templates. Whether you need agile templates for sprint planning or project backlog templates, Visor has it. Visor also offers tons of Gantt chart templates for Jira.
Example of Project Gantt Chart template with Jira Data:
It’s free to get started with Visor – no credit card needed. Check us out in the Atlassian Marketplace or learn more in the video below.