
How to Do a Jira Bulk Edit: Tutorials with Video


Start using Visor today
- Visualize all your projects and data

- Roll up multiple projects into portfolio views
- Try Visor for FREE
You often have to manage multiple complexities when updating and syncing Jira tickets – that’s why we’re here to unpack the nuances of Jira bulk editing and Jira bulk changes to empower you with the tools you need to manage your projects more efficiently. We’ll also walk you through two ways to make bulk edits with your Jira in easy-to-follow tutorials.
In this post, we’ll cover:
- Why the Jira bulk edit is necessary
- Top 5 reasons why you’ll need to make Jira bulk edits
- Two different options to perform a Jira bulk update on your projects
Looking for a faster way to handle your Jira bulk edits? Make changes at scale with Visor – a project portfolio management tool that integrates with the tools your team is already using, like Jira and Asana, to help you handle every project at scale. Get started for free today!
Why Jira Bulk Editing Is Necessary
Managing projects in Jira often means dealing with an extensive list of individual tickets, each representing a specific task or piece of work. Updating multiple tickets simultaneously can make your life easier as projects progress and evolve.
Imagine this scenario: You’re rolling out a critical software update, and nearly 100 tickets must reflect the same change. Without Jira bulk editing capabilities, this would entail painstakingly opening each ticket individually and making identical updates. Not only is this time-consuming, but it also leaves room for errors to creep in.
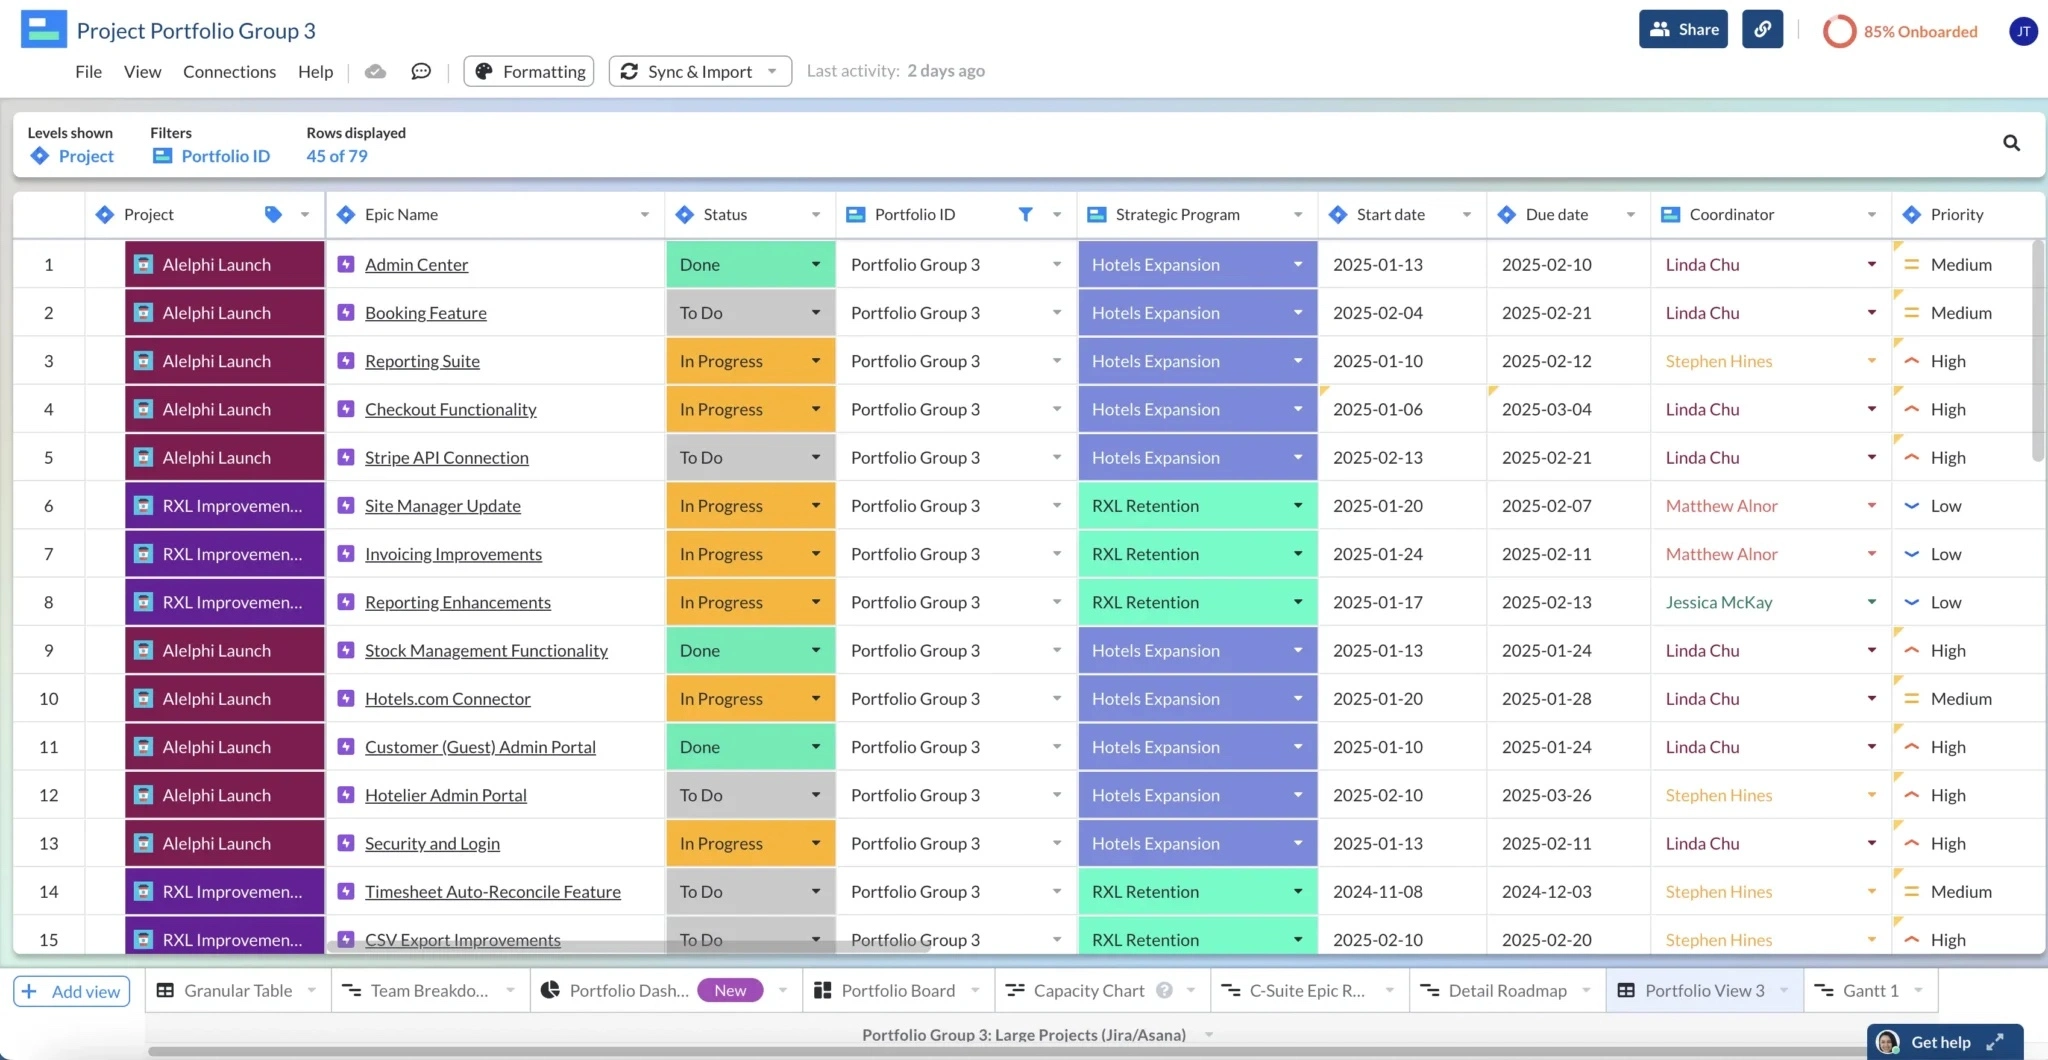
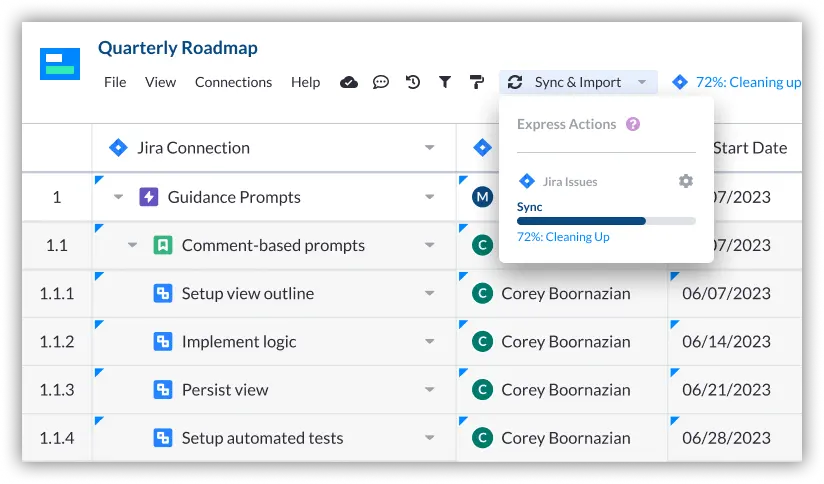
A Jira-integrated table in Visor
Jira bulk editing is the epitome of “work smarter, not harder.” Bulk editing helps you do less manual work and increases the chances that the updates you make will be accurate. It saves you time, effort, and stress while effectively minimizing the margin of error.
You’re busy enough at work without wasting hours making manual changes to every project in your portfolio. You need realistic bulk update capabilities to find true success. Luckily, it doesn’t have to be as hard as Jira makes it.
Let’s dig into why Jira bulk changes are so powerful, and how you can make them happen fast.
5 Advantages of Making Jira Bulk Edits
Now that you know why Jira bulk edits are necessary, let’s explore specific cases you may face requiring you to make Jira bulk updates. These are the top reasons a project manager needs to make a Jira bulk edit.
1. To Update Multiple Issues at Once:
Juggling many issues is the headache-inducing side of project management that nearly everyone faces. Editing your issues quickly, without opening each one individually, is a welcome breath of fresh air. Jira bulk editing helps you maintain control and efficiency of your workload and issue management process, no matter how extensive your project is.

2. To Prioritize or Make Updates In Your Backlog:
Imagine a project where you need to update the status of numerous tickets from “In Progress” to “Done” simultaneously. Updating each ticket individually is not only tedious but also prone to errors. Jira bulk editing simplifies complex tasks like backlog updates, allowing you to update all statuses simultaneously with a few clicks. It also makes backlog prioritization and Jira backlog grooming a whole lot easier.
3. To Improve Accuracy and Consistency:
Ensuring that start dates, end dates, and assignees are consistent and up-to-date across all relevant tickets can be a Herculean task. Jira bulk editing empowers you to clean up your data swiftly and accurately, leaving no room for discrepancies.
4. Because of Regulatory Compliance and Urgent Security Issues:
In some industries, regulatory requirements mean you must swiftly update and revise project-related data. Additionally, let’s say you’re facing a critical situation like a security breach; Jira bulk editing ensures you can address these issues quickly, meet compliance standards and efficiently handle urgent matters.
5. To Migrate Data:
If you’re migrating your Jira instance from a server to the cloud or even migrating from Excel spreadsheets to Jira, bulk editing becomes indispensable. It streamlines the transition process, helping you ensure data consistency without the headache of manual updates.
Option #1: Make Jira Bulk Edits in Visor (4 Steps)
While you can export Jira data to Excel, that data will quickly grow stale. Other tools, like Jira Cloud for Sheets, only have a one-way sync to Google Sheets, which also is unideal.
Visor’s Jira spreadsheet is different. Visor simplifies your Jira bulk edits in a variety of ways.
With Visor, you can:
- Adjust tasks, statuses, and dates
- Push bulk updates back and forth between Visor and Jira
- Provide Jira guest access to stakeholders who need secure, clear, and beautiful reports (but who don’t use Jira)
- Keep data in sync at the click of a button through a two-way sync with Jira
The process is easy, and you can make your Jira bulk edits in four fast steps.
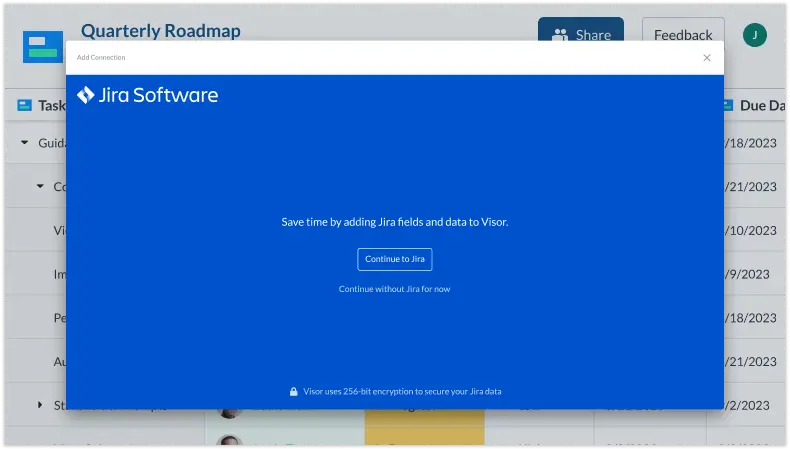
Step 1: Connect your Jira data to Visor.
Connecting your Jira data is secure, and your projects import almost immediately.
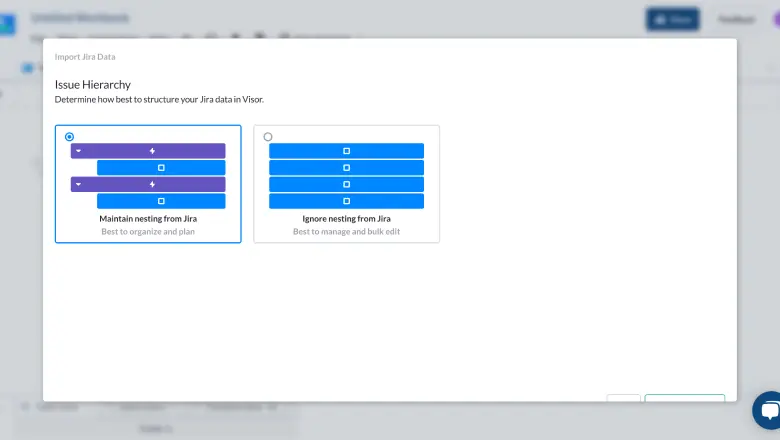
Step 2: Pick the Jira project with issues you need to update in bulk. Choose to maintain Jira nesting.
You can also use JQL to import multiple Jira projects into Visor for project portfolio management or editing data across multiple projects. Our JQL cheatsheet provides you an easy primer to get started.
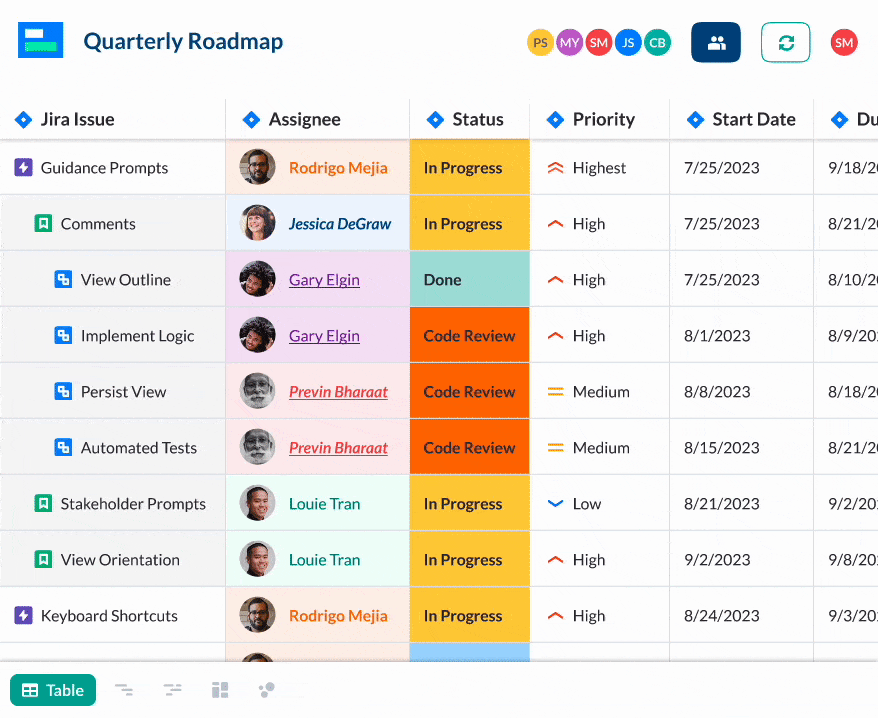
Step 3: Choose the Jira fields you want to bulk edit after your project imports.
Pro-tip: You can do this by hovering your mouse over to the bottom corner of the individual cell until a plus sign “+” appears. Then, drag your mouse down to make your jira bulk update.
Step 4: Push these changes to Jira by hitting sync in Visor.
Visor also uses AI to simplify your Jira workflow
Visor also offers AI Smart Templates, which make it even easier to create spreadsheet reports with your Jira data. Check out the video below to see how it works and explore why Visor is one of the most useful AI project management tools on the market.
You can get started with Visor for free today. No credit card is needed. Once you register, you’ll discover that setting up a Jira integration is simple and secure.
Video Tutorial: Make Jira Bulk Changes in Minutes
Want to see how to easily make Jira bulk updates in Visor? We’ll show just how simple it is in this 1-minute video.
Also, check out Visor’s Atlassian Marketplace Listing to see our glowing reviews.
Option #2: Make Jira Bulk Edits Within Jira (9 Steps)
Jira lets you make bulk edits. There are 9 steps, which we’ll walk you through. If you want to make many changes to your Jira data in fewer steps using a spreadsheet, check out the Visor tutorial in the next section.
Step 1: Click the search bar.
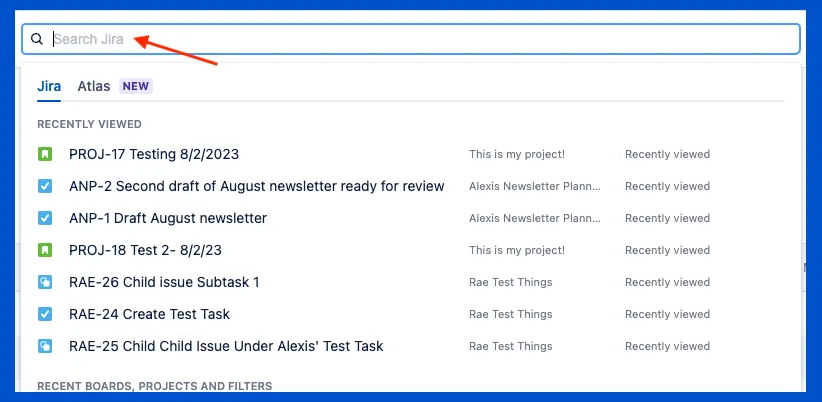
Step 2: Next, scroll down until you see “view all issues” at the bottom.
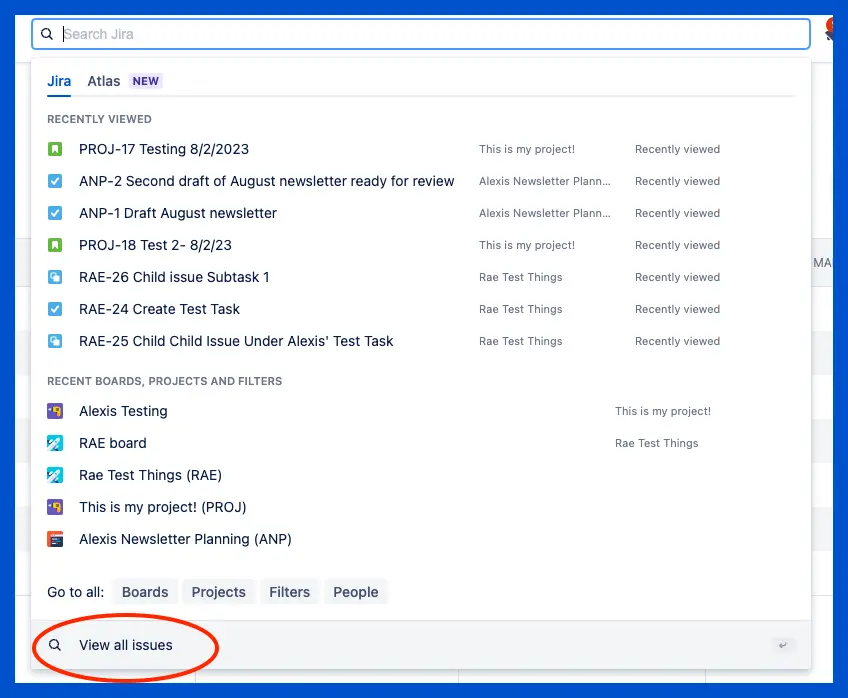
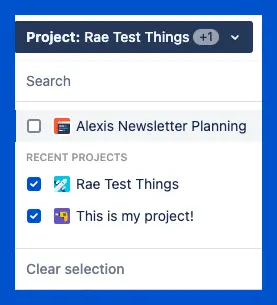
Step 3: Select the project you want Jira bulk edit from there.
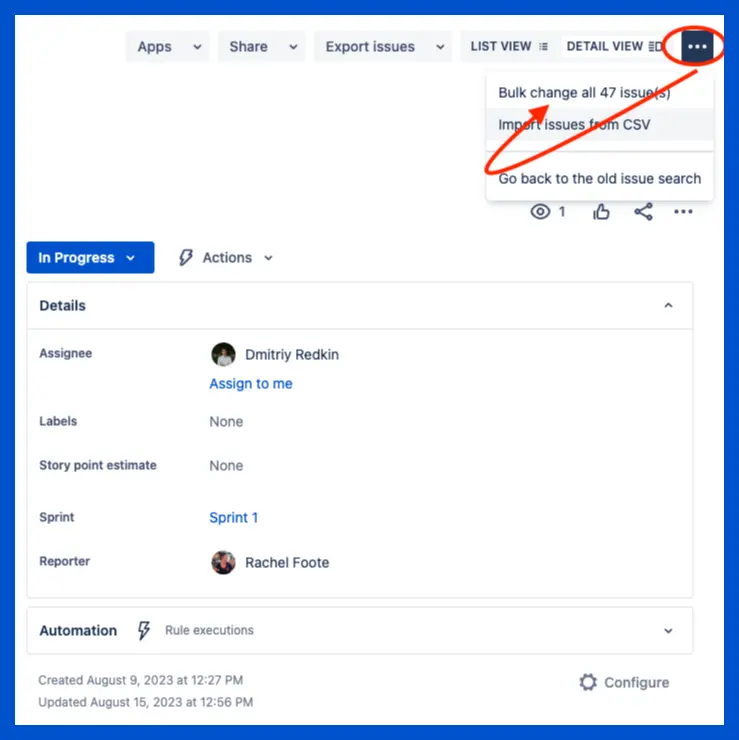
Step 4: Click the three dots next to “detail view,” then click “bulk change”.
You’ll find the three dots in the drop-down on the right side of your screen. If you have trouble finding the three dots, you’ll find it underneath the search bar.
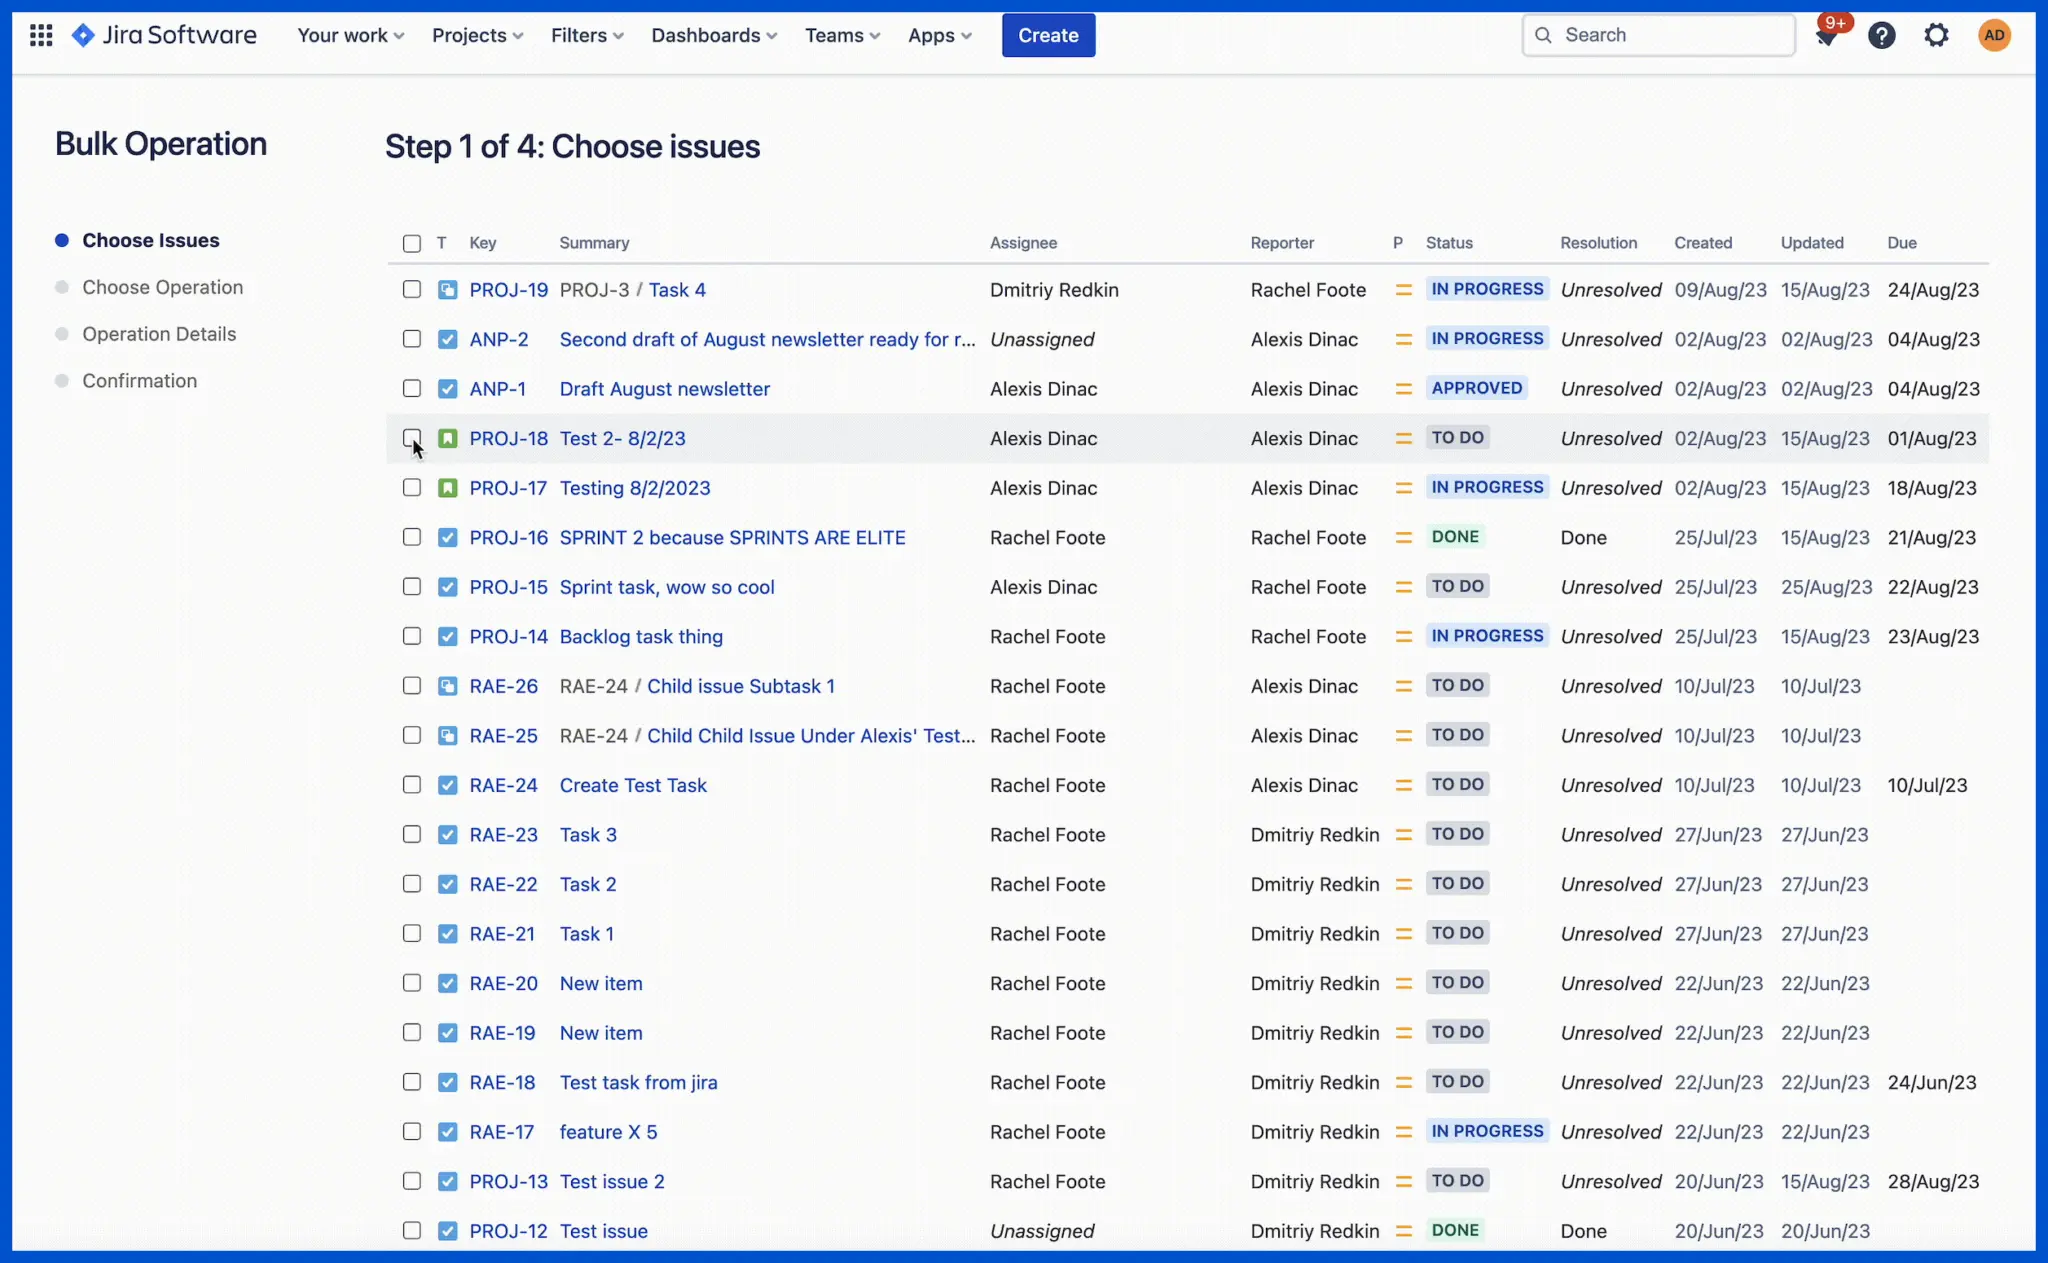
Step 5: Select the issues you want to perform your Jira bulk edit.
You’ll need to have a bit of patience with yourself here. For instance, if you want to change issues status from to-do to in-progress, you must select each issue individually.
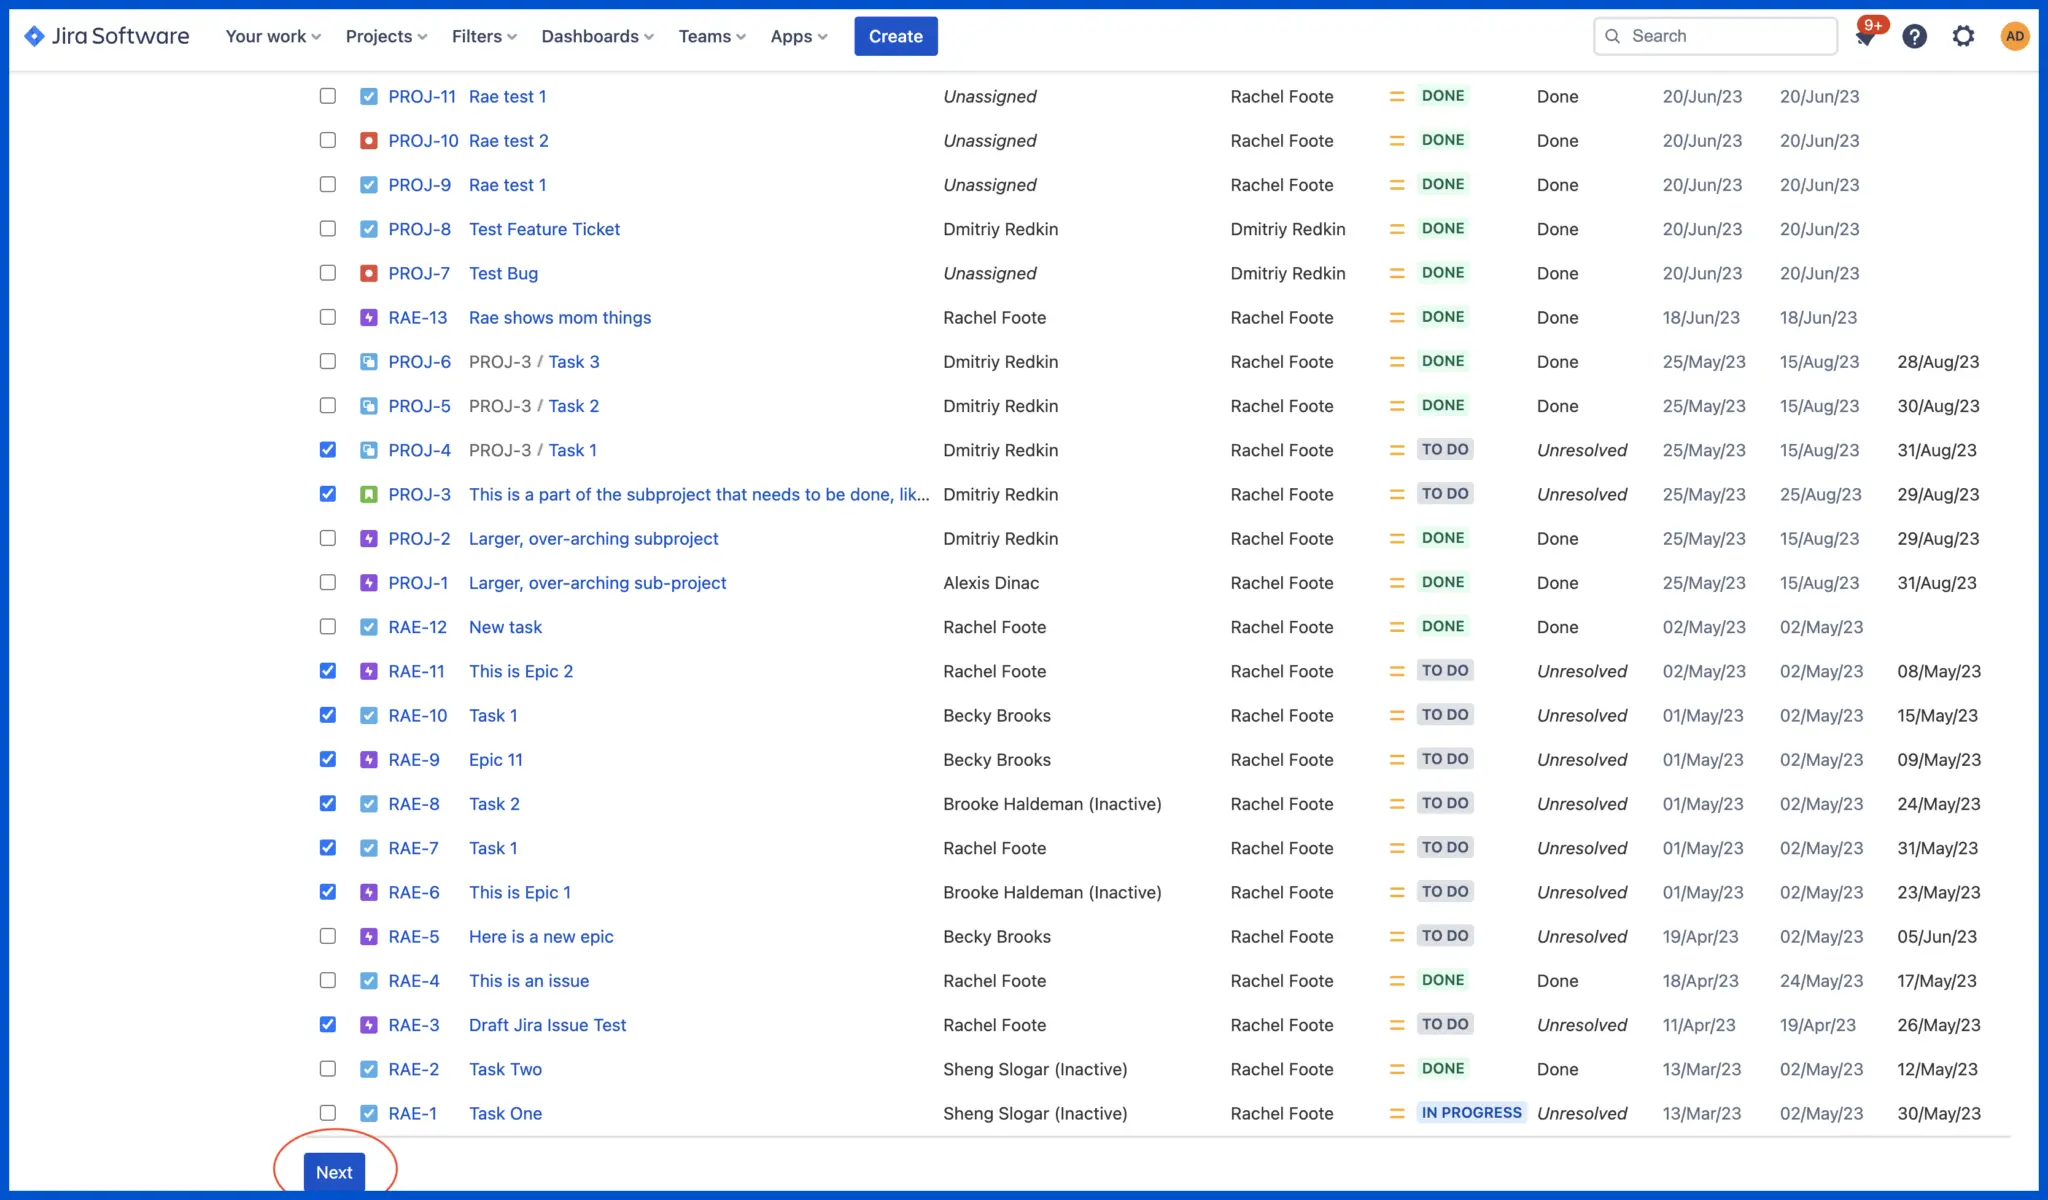
Step 6: After selecting the issues you want to edit, scroll to the bottom and click next.
Step 7: Now, click the option to edit issues and click next.
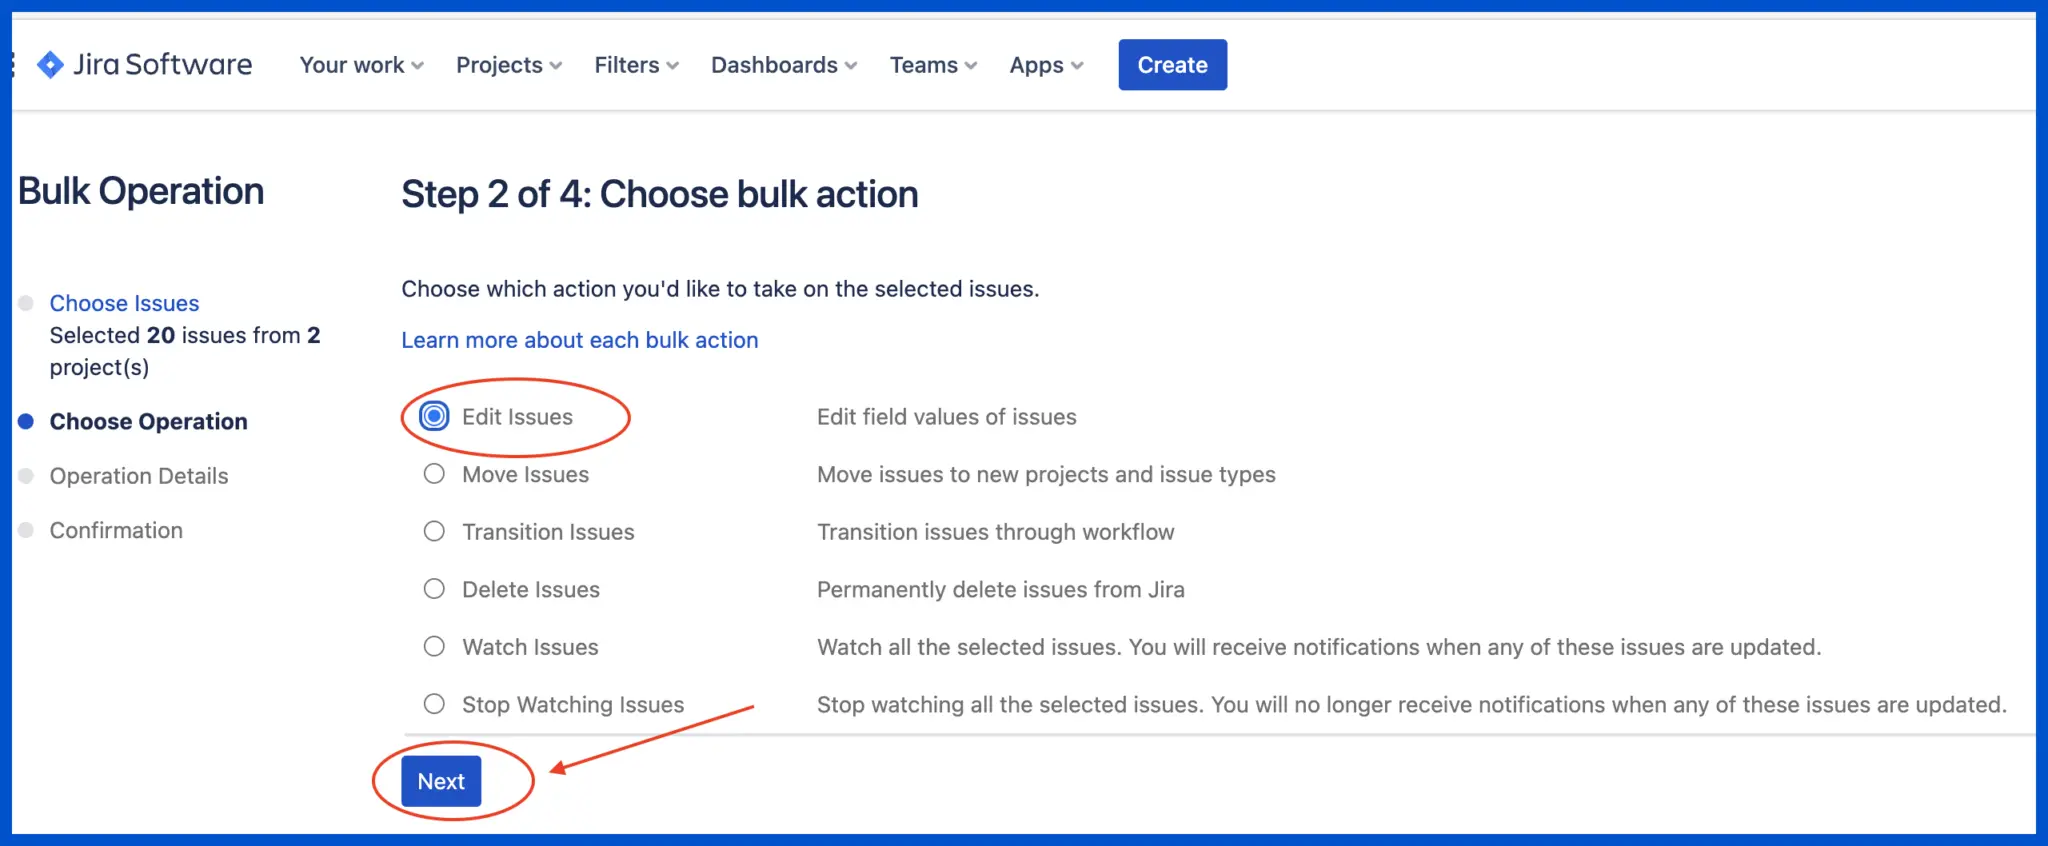
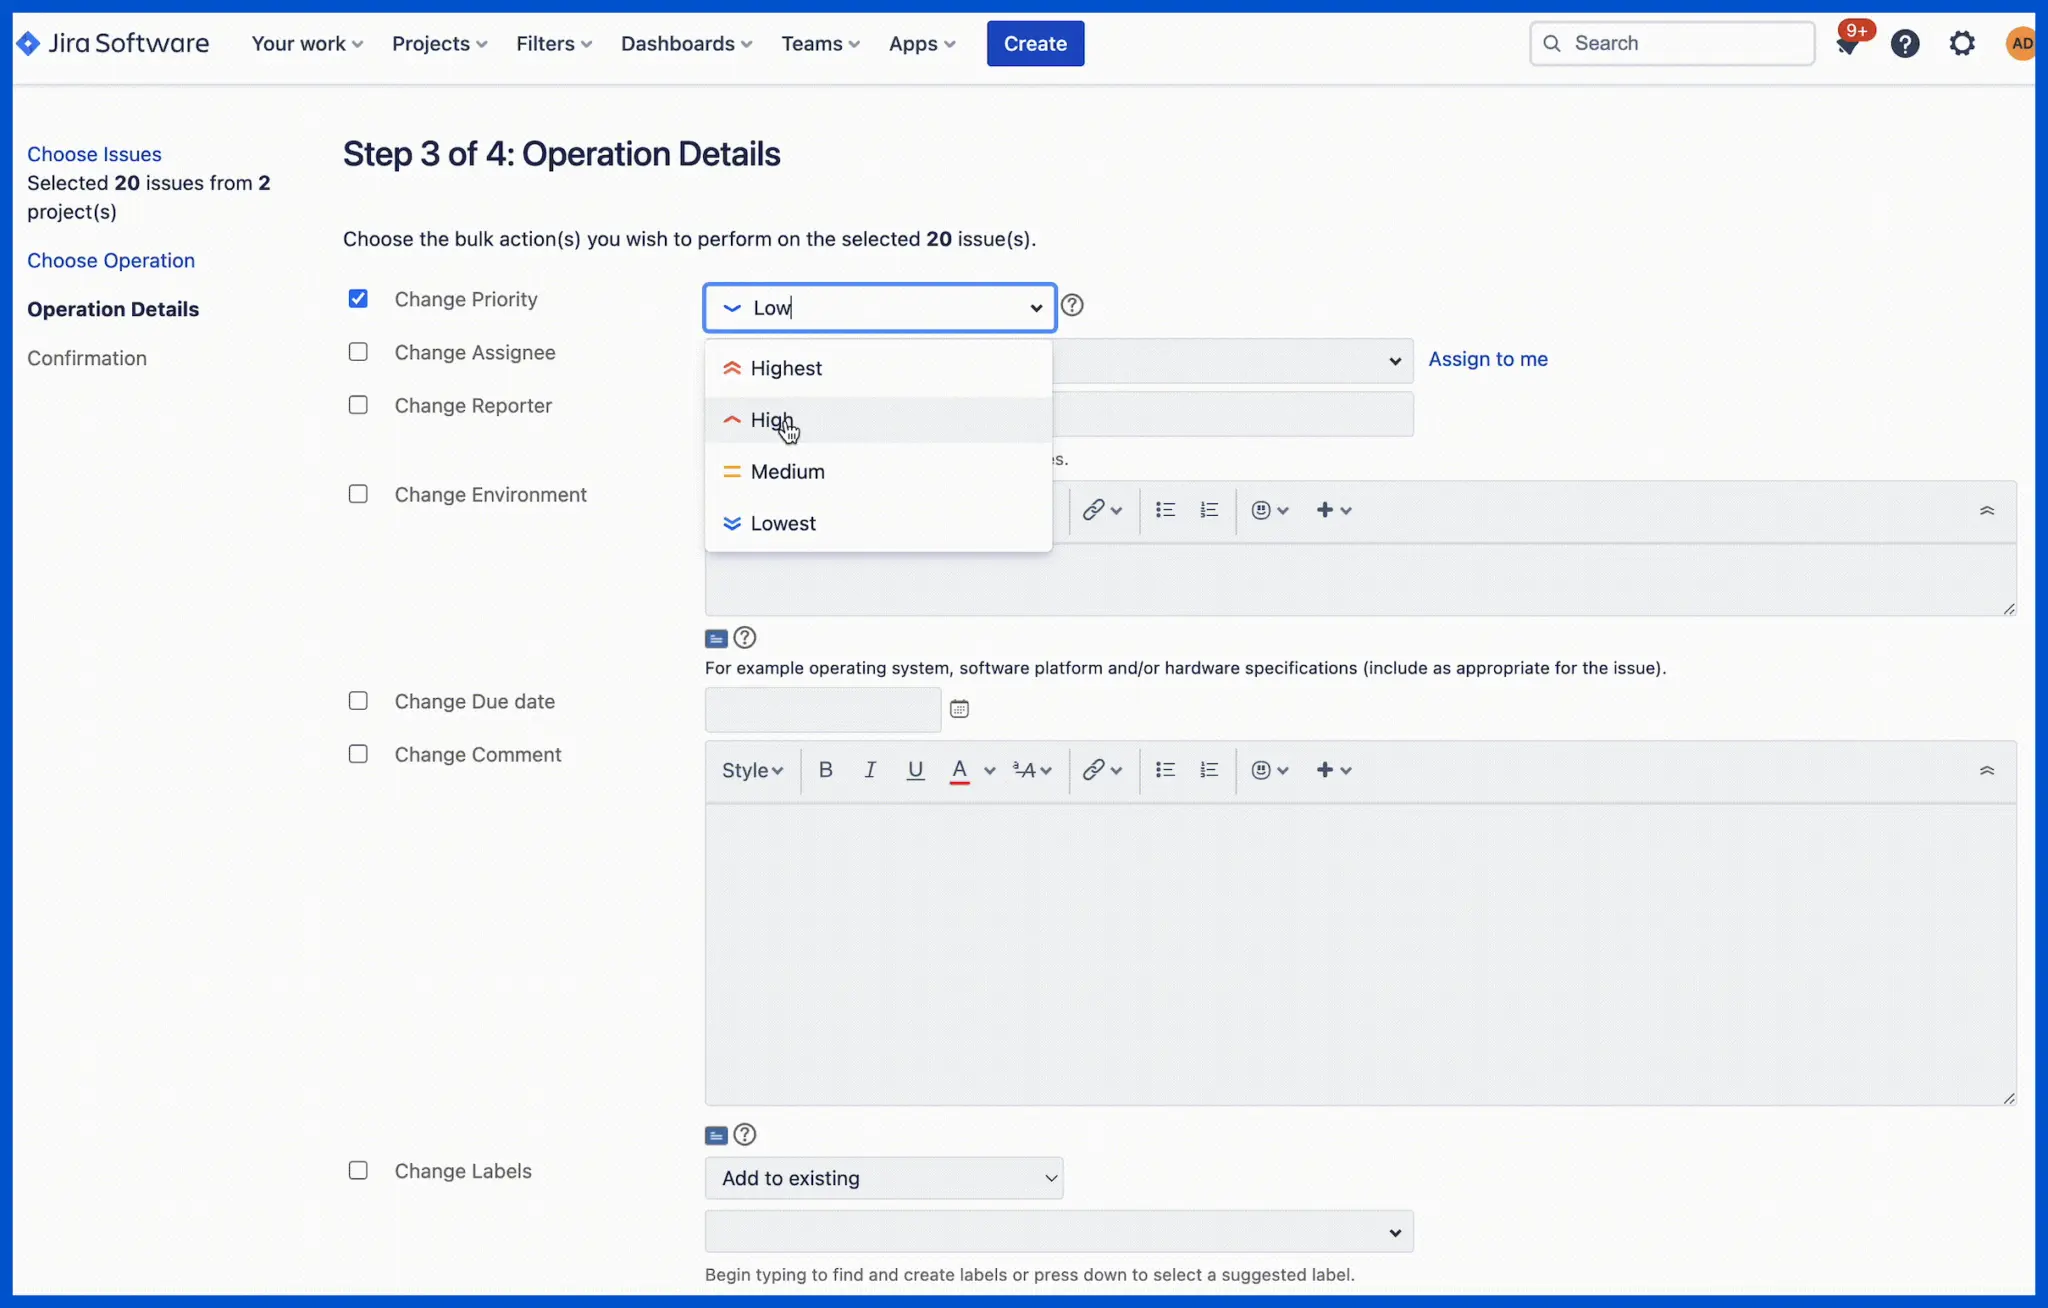
Step 8: You will see roughly 33 choices to perform your Jira bulk edit.
In this instance, I needed to update the priority and the risk for each issue I selected.
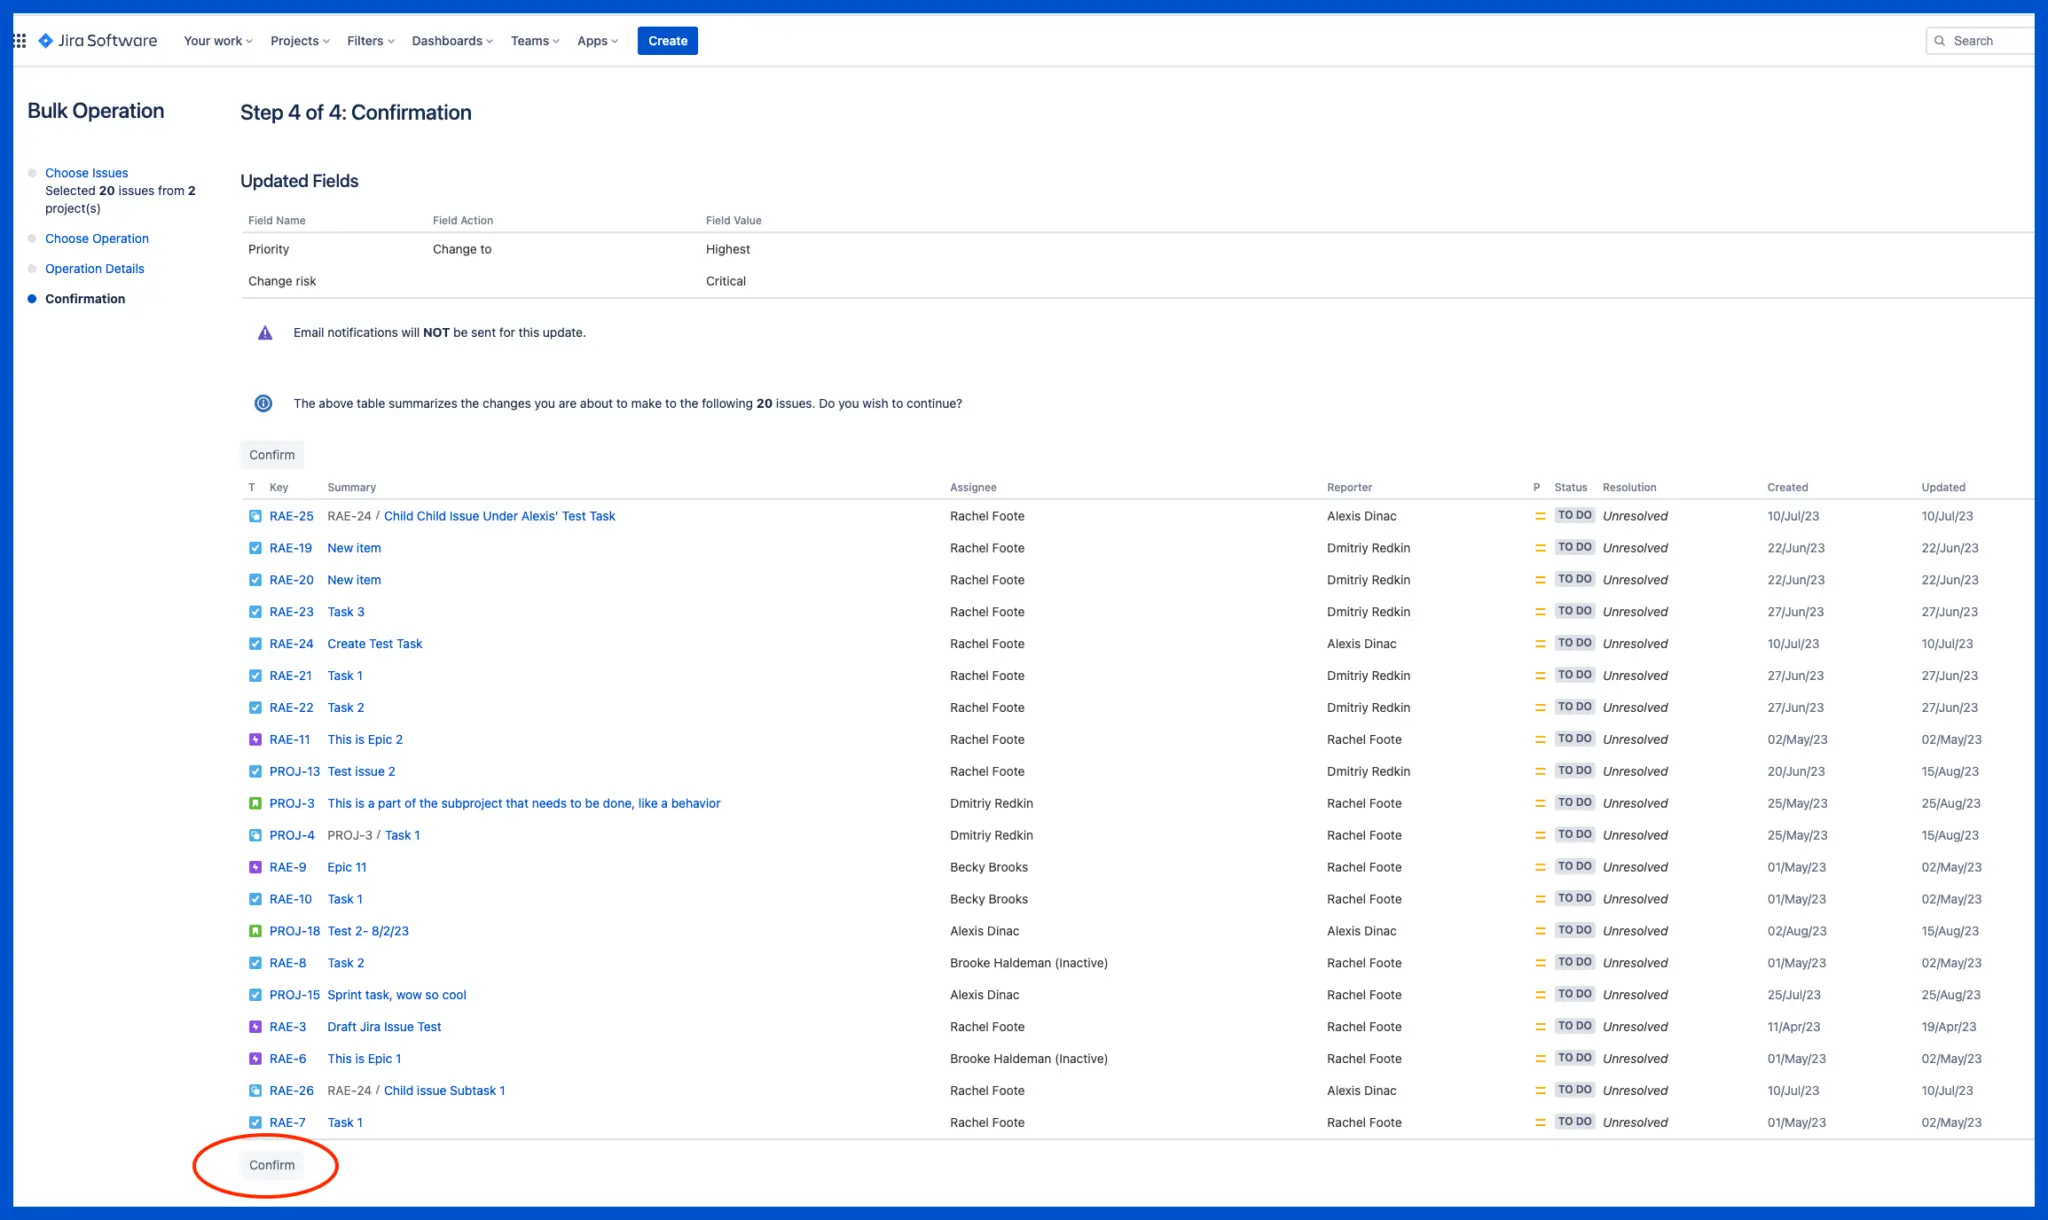
Step 9: After you select the changes you want to make your issues in Jira, click next to confirm, and you’re finally finished.
(Note: Double-check that you have selected all the issues you want for your Jira bulk edit; otherwise, you run the risk of repeating a step.)
Reclaim Your Time & Manage Your Portfolio of Projects More Efficiently
Minimize the time you waste at work making Jira bulk edits. With tools like Visor, you can skip the long, manual processes and get more done faster.
If you are working with multiple Jira projects, you can save a massive amount of time using Jira bulk edits. Jira portfolio management is a daunting undertaking and Jira portfolio plug-ins can be expensive. Visor makes all that easier by providing a Jira spreadsheet that feels familiar but that stays connected to your Jira data.
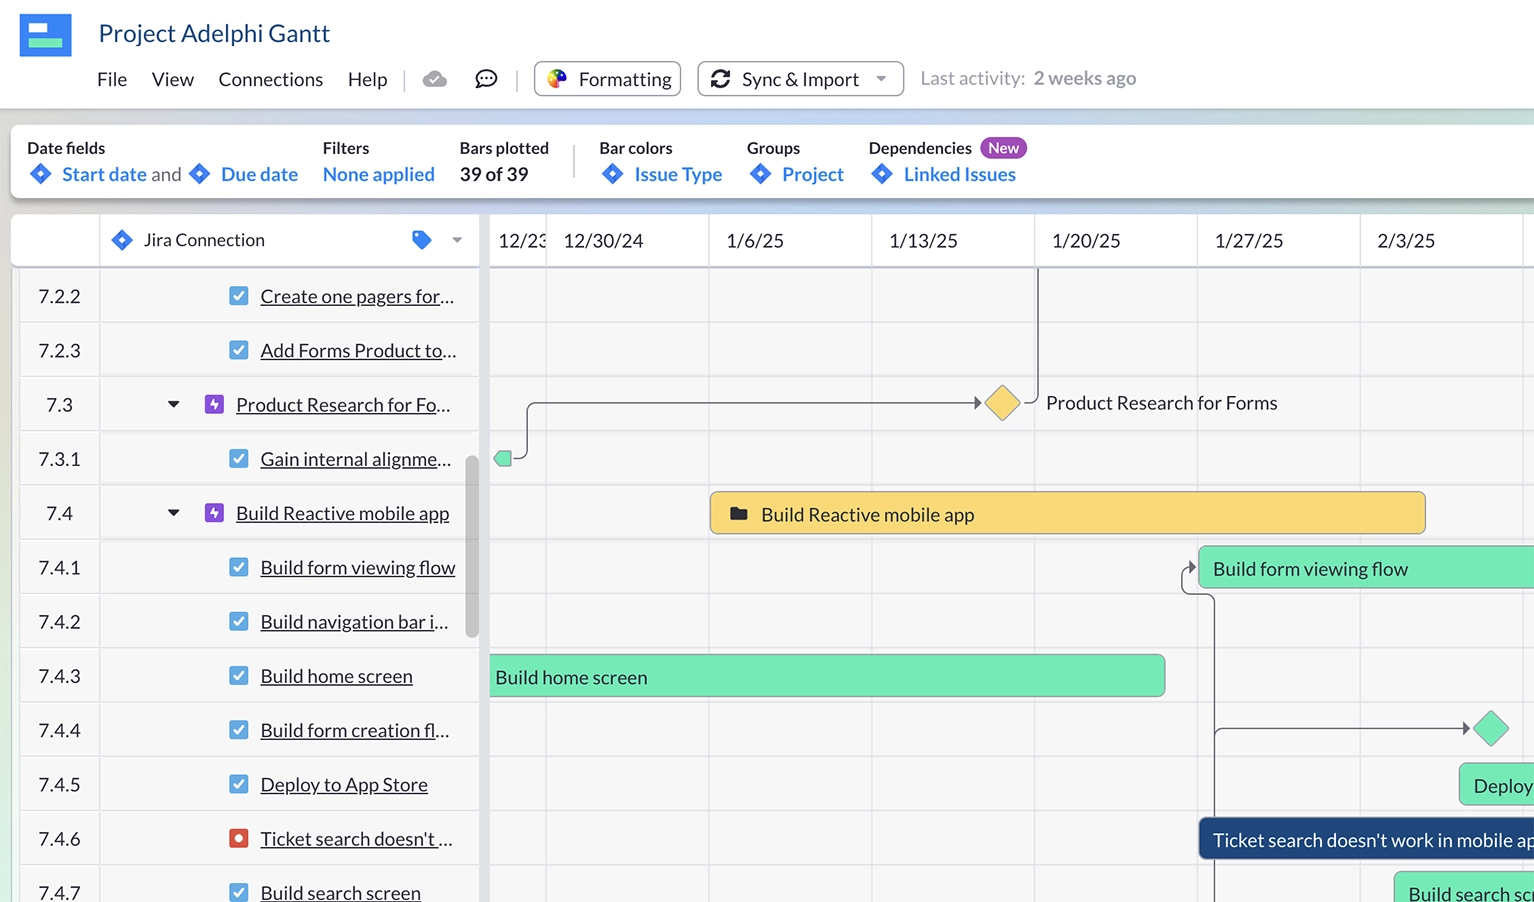
Visor offers a ton of free Jira-friendly templates using our spreadsheet-like Table view. We also offer Kanban templates for agile teams, such as sprint planning or project backlog templates and Gantt chart templates for Jira.
Example of Project Gantt Chart Template in Visor with Jira data:
Save time avoiding tedious tasks while managing every project in your portfolio efficiently, which will connect your team and wow your stakeholders. Get started today for free – no credit card needed.
You can learn more in our Atlassian Marketplace listing or in the video below.